How do you level ground for pavers is a crucial question that marks the beginning of any successful paver installation project. Proper ground preparation ensures the longevity, stability, and aesthetic appeal of your paved surface—whether it’s a patio, walkway, or driveway. Without a well-leveled and compacted base, pavers can shift, sink, or crack over time, leading to costly repairs. In this guide, you’ll learn a step-by-step process for leveling the ground, the essential tools you’ll need, expert tips to make the job smoother, and advice on when it’s best to call in a professional. Whether you’re a DIY enthusiast or exploring your options, this overview will help you start your project on solid ground.
Why Leveling Ground is Crucial for Paver Projects
Creating a level ground for paver installation is one of the most important steps in any paving project. Here’s why this foundational step is critical:
- Preventing Uneven Surfaces and Tripping Hazards
Without a properly level ground for paver placement, the surface can become uneven, creating dangerous tripping hazards. A flat base ensures each paver sits securely and uniformly, reducing the risk of accidents. - Ensuring Long-Term Durability and Stability
A well-leveled base provides a solid foundation that supports the weight of the pavers and anything above them—be it foot traffic, furniture, or vehicles. Skipping this step can lead to shifting, cracking, or sinking over time. - Avoiding Water Drainage Issues and Future Maintenance Costs
Poor leveling can lead to water pooling or improper drainage, which erodes the base and damages the pavers. By establishing a level ground for paver installation, you help guide water away from the surface and prevent costly repairs. - Boosting the Aesthetic Appeal of the Finished Area
A perfectly flat and even surface greatly enhances the visual appeal of patios, walkways, or driveways. A level ground for paver layout allows for clean lines and a polished, professional look that lasts.
Equipment and Supplies Needed for Paver Installation on a Level Surface
Before you begin preparing a level ground for paver projects, make sure you have the right tools and materials on hand. Proper preparation ensures efficiency, safety, and professional results.
Basic Tools
- Shovel – For digging out the area and removing excess soil.
- Rake – Assists in uniformly spreading and leveling the base materials.
- Tamper – Essential for compacting soil and gravel layers manually.
- Level – Ensures the ground is flat and properly sloped for drainage.
- Measuring Tape – For accurate measurements of the area.
- String Line – Helps you maintain alignment and ground level.
Optional Tools
- Plate Compactor – A powered tool that makes compacting base material faster and more effective than manual tamping.
- Tiller – Helpful for breaking up tough soil and loosening the ground before leveling. A tiller can significantly speed up the process, especially on larger or compacted areas.
Safety Gear
- Gloves – Keep your hands safe from rough materials, sharp objects, and blisters.
- Goggles – Shield your eyes from dust, debris, and flying particles.
- Work Boots – Provide foot protection and stability on uneven terrain.
You can read about paver installation service in Bay area.
How Do You Level Ground for Pavers in Easy Steps
Creating a stable and long-lasting paver surface starts with learning how to properly level ground for pavers. Follow these easy steps to ensure your project is both durable and attractive:
Step 1: Plan and Mark the Area
Start by outlining the space where you’ll lay the pavers. Use stakes and string to define the perimeter clearly.
- Measure the area carefully.
- Determine the slope needed for water drainage—typically a 1-inch drop for every 4 feet of length helps prevent pooling.
Step 2: Clear the Area
To level ground for pavers, you must first remove all grass, rocks, debris, and topsoil to the desired depth. This creates a clean slate for layering and leveling the base.
Step 3: Is It Possible to Level Ground for Pavers Using a Tiller?
Yes—using a tiller can be a smart move if the soil is compacted or uneven.
- A tiller breaks up hard ground and mixes soil for a more uniform surface.
- Use it in passes, keeping control of depth and direction.
- However, skip the tiller if the soil is already loose and easy to grade. Over-tilling can make compaction harder later on.
Step 4: Level and Grade the Soil
Check the surface often with a level and a string line.
- Make small adjustments by adding or removing soil as needed.
- Ensure the slope is consistent to allow for proper drainage and avoid water damage under the pavers.
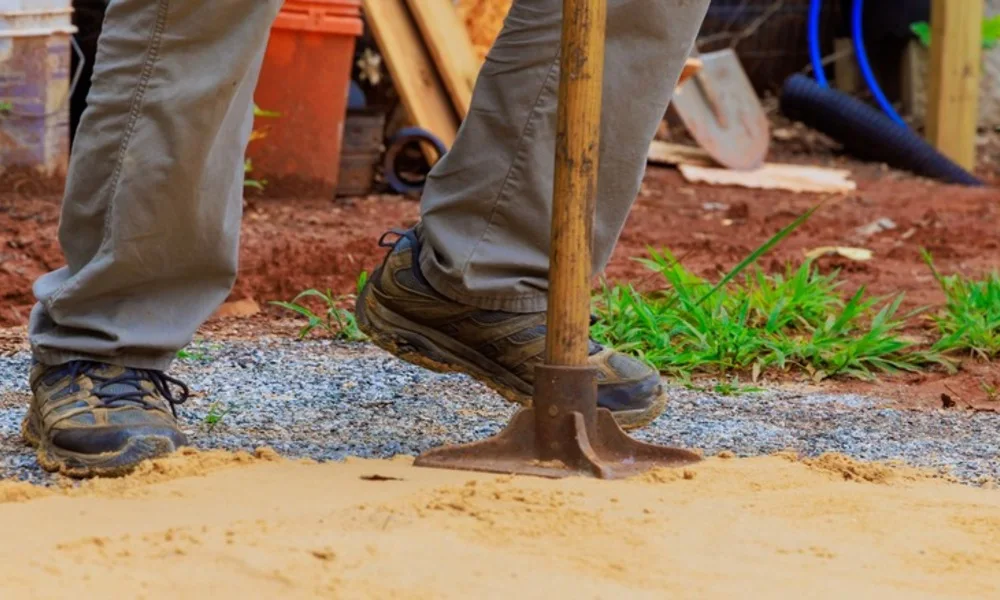
Step 5: Compact the Soil
Once you’ve roughly leveled the soil, it’s time to compact.
- Use a hand tamper for small areas or a plate compactor for larger jobs.
- Compact in layers (about 2–3 inches at a time) to build a firm base that won’t shift over time.
Step 6: Add and Level the Base Material
Lay down a layer of gravel or crushed stone—this forms the load-bearing foundation.
- Spread the material evenly, keeping the slope intact.
- Compact it thoroughly to prevent settling later on.
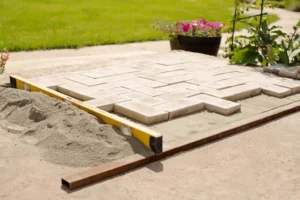
Step 7: Screed the Sand Layer
Finish by adding a 1-inch layer of bedding sand.
- Use a screed board (or a straight piece of wood) to make the surface perfectly level.
- This step ensures the pavers sit flat and even once installed.
You should read about How To Remove Oil Stains From Pavers.
When to Call Professionals to Level Ground for Pavers
While smaller paver projects can be a satisfying DIY task, there are situations where calling in the pros is not only smart—it’s essential. At Lakota Design Group, we specialize in making sure your foundation is flawless, safe, and built to last.
Large or Complex Projects
If your project involves a long driveway, steep slopes, or a large patio, the precision needed to level ground for pavers properly increases dramatically. Professional equipment and expertise can save you time and prevent costly mistakes.
Soil Issues or Poor Drainage
Unstable or clay-heavy soil? Existing drainage problems? These challenges require experience and technical know-how to address effectively. We analyze and correct these issues to ensure long-term stability.
Lack of Time, Tools, or Experience
Let’s face it—preparing a perfectly level base takes more than just enthusiasm. Without the proper tools like plate compactors, laser levels, or tillers, and the experience to use them, your DIY project can quickly become overwhelming and expensive.
Cost-Benefit of Hiring a Pro
While DIY may seem cheaper upfront, mistakes in leveling the ground can lead to uneven pavers, poor drainage, and premature repairs—ultimately costing more. Hiring professionals like Lakota Design Group means peace of mind, guaranteed results, and lasting beauty.
Let the Experts Handle
Don’t risk the foundation of your investment. Trust Lakota Design Group to expertly level ground for pavers, ensuring a smooth, durable, and beautiful result. Contact us today for a consultation and quote!
FAQs
Why Is It Important To Level Ground For Pavers?
Leveling the ground ensures a stable, even surface for pavers. It helps prevent shifting, cracking, and tripping hazards, and is essential for proper water drainage.
How Deep Should I Dig When Preparing To Level Ground For Pavers?
You’ll typically dig 6–8 inches below the desired finished height to accommodate the base materials (gravel and sand) and pavers. Depth may vary based on the paver type and project load (e.g., patios vs. driveways).
Can I Level Ground For Pavers Without A Plate Compactor?
While possible on very small projects using a hand tamper, a plate compactor is highly recommended for effective compaction. It helps prevent settling and maintains a flat surface over time.
How Do I Make Sure The Ground Is Level And Has Proper Drainage?
Use a string line and a level to guide grading. For drainage, ensure the base has a slight slope—typically a 1-inch drop every 4 feet away from structures.
Can I Use A Tiller To Level Ground For Pavers?
Yes, a tiller is useful for breaking up compacted soil, especially in large or rough areas. However, you’ll still need to grade and compact the soil afterward.