Installing a paver walkway is one of the most rewarding ways to enhance the look and feel of your outdoor space. Whether you’re designing a charming path through your garden or a solid, stylish walkway leading to your front door, this project offers both beauty and functionality. Installing pavers for walkway areas is a smart investment that adds curb appeal and long-term durability. In this guide, you’ll learn exactly how to install a paver walkway with confidence and care, step by step.

Why Should You Install a Paver Walkway?
Before we get into the nitty-gritty of how to install paver walkway, let’s discuss the reasons why this project is worth considering.
- Aesthetic Appeal: A well-designed walkway can completely change the look of your yard, giving it a polished and inviting appearance.
- Increased Property Value: Properly installed pavers not only improve your outdoor space but can also increase the market value of your home.
- Durability: Paver walkways are built to last, able to withstand heavy foot traffic, weather changes, and the test of time without cracking like traditional concrete.
- Customizable Options: Whether you’re looking for sleek, modern lines or rustic charm, installing a paver walkway allows you to select the perfect materials to match your style.
Materials You Will Need for Installing a Paver Walkway
Before you get started, it’s important to have all the necessary tools and materials. Here’s what you’ll need for Bay area paver installation for walkway:
- Pavers: Choose the material and design that complements your outdoor space. Whether it’s classic brick, cobblestones, or concrete pavers, select pavers that suit both the look and durability you need.
- Gravel Base: This is the foundation of your walkway, providing stability and drainage. The gravel should be coarse and compacted well.
- Sand: Fine sand is needed for leveling the surface and filling the gaps between the pavers.
- Landscape Fabric: This fabric helps keep weeds at bay, ensuring that your walkway remains clean and clear.
- Edging Material: To ensure your pavers stay in place, you will need some type of edging material such as metal or plastic.
- Compactor: This tool helps compact the gravel and sand layers, ensuring that everything is level and stable.
- Rubber Mallet: This will allow you to tap the pavers into place without damaging them.
Step-by-Step Guide on How to Install a Paver Walkway
1. Plan and Mark the Path
Start by planning the route of your walkway. Using a garden hose or spray paint, outline the path where you want your pavers to go. Make sure the path is straight or gently curved, depending on your design preference. Be sure to mark the width and length accurately to avoid any errors later on.
2. Excavate the Area
The next step in installing a paver walkway is excavation. You’ll need to dig out the pathway to a depth of about 4-6 inches, depending on the size of your pavers. The depth is important for providing enough room for your gravel base and sand layer.
Ensure the surface has a slight slope to facilitate proper drainage, as this will help prevent puddles and flooding on your walkway.
3. Lay the Gravel Base
Once the area is prepared, it’s time to lay the gravel. Spread a 3-4 inch layer of gravel over the excavated area. Use a rake to level it, and then compact it using a plate compactor. This ensures that the gravel is stable and won’t shift over time. The gravel acts as the drainage system for your walkway, keeping the pavers in place while allowing for proper water flow.
4. Add Landscape Fabric
Lay landscape fabric over the compacted gravel. This fabric will help keep weeds from growing through your pavers. It also helps separate the gravel from the sand layer, preventing the two from mixing over time.
5. Spread the Sand Layer
On top of the landscape fabric, add a thin layer of sand (about 1 inch). This sand layer will act as a leveling base for your pavers and make it easier to adjust them as you lay them down. Use a rake to level the sand, ensuring it’s evenly spread across the path.
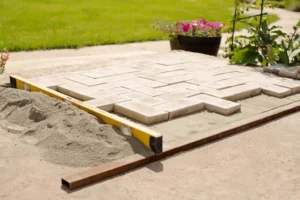
6. Start Installing the Pavers
Now it’s time for the fun part—installing pavers for walkway! Start at one end of the walkway and place the first paver gently into the sand. Continue placing each paver next to the previous one, leaving small gaps between them for the sand to fill.
As you go along, make sure that each paver is level and aligned. Use a rubber mallet to gently tap the pavers into place, ensuring they’re snug and secure. If necessary, cut pavers to fit at the edges using a paver cutter or wet saw.
7. Fill the Gaps with Sand
Once all your pavers are in place, it’s time to fill the gaps between them. Pour some polymeric sand (or regular sand) over the surface, and sweep it into the joints using a broom. This sand will prevent weeds from growing and keep the pavers tightly in place.
After sweeping the sand into the joints, use a plate compactor to press the sand into the gaps and make sure everything is even and compacted.
8. Final Touches
Once the walkway is complete, give everything one final sweep to remove any excess sand from the surface. Inspect the walkway for any uneven pavers or gaps that need to be addressed. Adjust any pavers that may have shifted during the process.
you can read about How to Install a Paver Driveway
Common Issues to Avoid When Installing a Paver Walkway
While laying paver walkway can be a rewarding project, there are a few common mistakes to avoid:
- Improper Slope: If your walkway doesn’t have a proper slope, water will accumulate on the surface, potentially damaging the pavers or creating a muddy mess.
- Inadequate Base Layer: A weak gravel or sand base can cause the pavers to shift or settle unevenly over time. Ensure that the gravel is compacted thoroughly.
- Skipping the Edging: Without proper edging, the pavers may shift or become misaligned. Always use an edging material to secure the edges.
Conclusion
Installing a paver walkway is a great way to enhance your outdoor space, offering a durable and beautiful path that will withstand the elements. By following this step-by-step guide, you’ll be able to create a walkway that not only looks amazing but also adds practicality to your yard. Whether you’re improving your garden or upgrading your front yard, paver walkway installation offers an elegant and long-lasting solution.
If you’re looking for expert help with paver walkway installation, Lakota Design Group is here to assist. Contact us today to get started on your custom walkway design!
FAQs
What materials do I need to install a paver walkway?
You’ll need pavers, gravel, sand, landscape fabric, edging material, and a compactor to ensure a stable foundation for your walkway.
How deep should I dig for a paver walkway installation?
You should excavate about 4-6 inches deep, depending on the size of the pavers, to ensure proper base support for the walkway.
How do I prevent weeds from growing in my paver walkway?
Lay landscape fabric before adding gravel and sand, and fill the gaps between pavers with polymeric sand to reduce weed growth.
How do I maintain a paver walkway?
Regularly sweep sand into the joints and check for any shifting pavers. Clean the surface as needed to prevent debris buildup.