Author name: admin

What is Landscaping? Explore Design Ideas & Tips
Uncategorized

What is Landscaping? A Guide to Outdoor Design

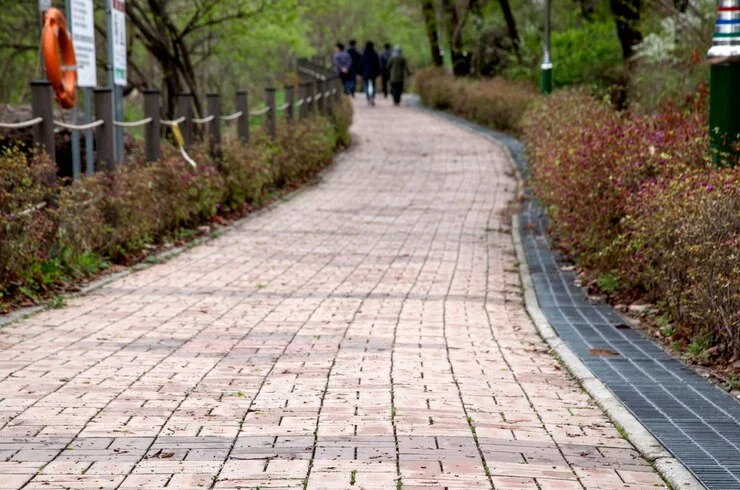
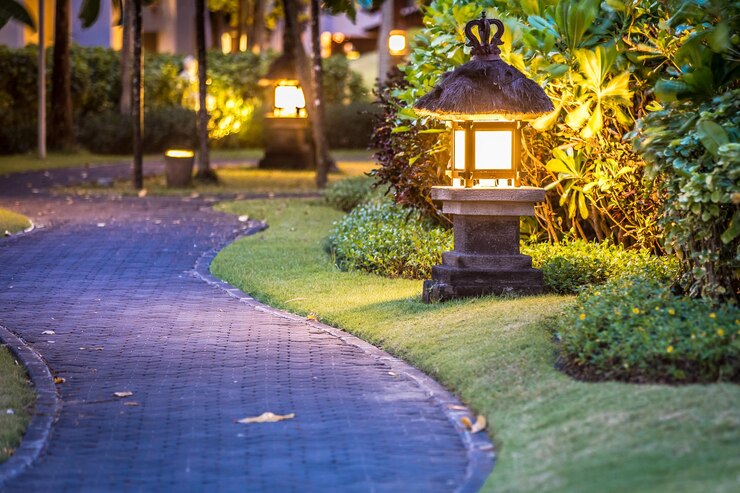
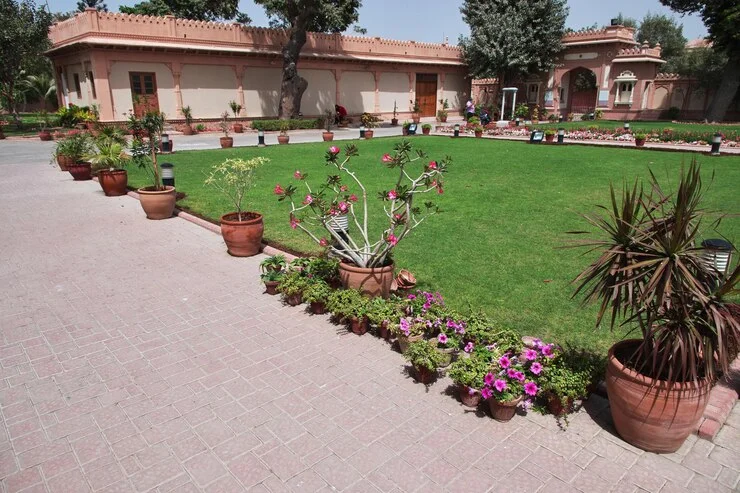
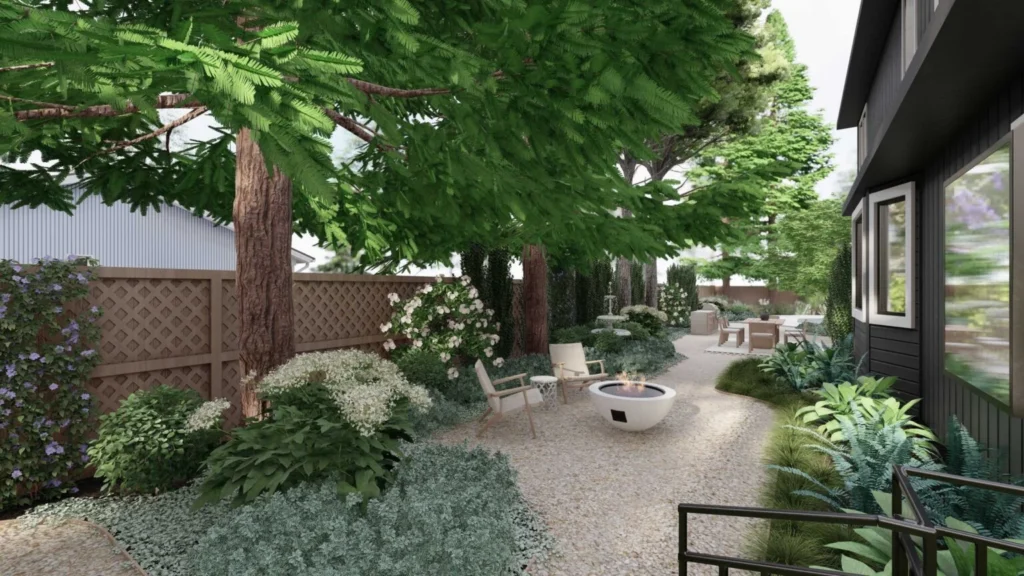
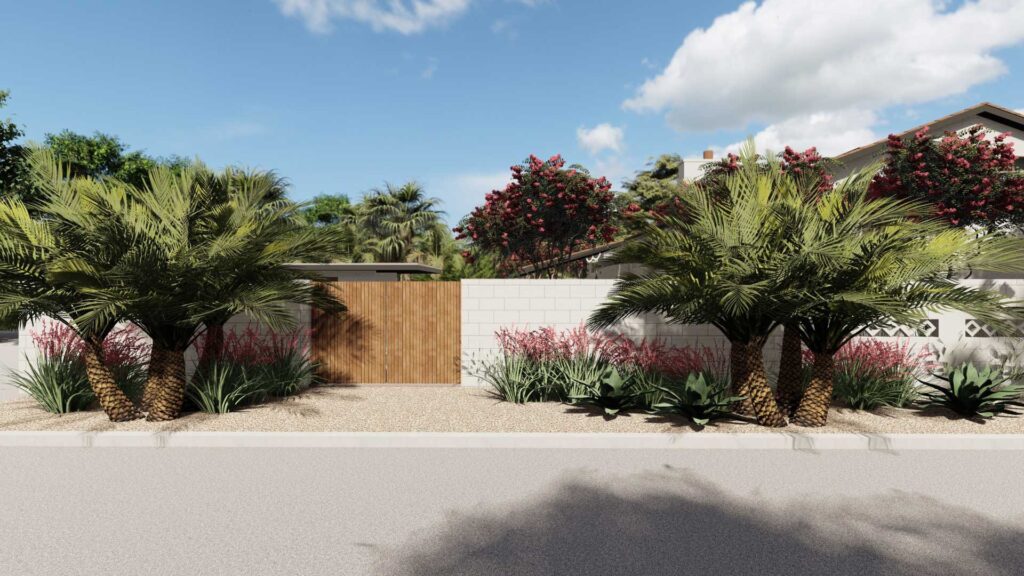
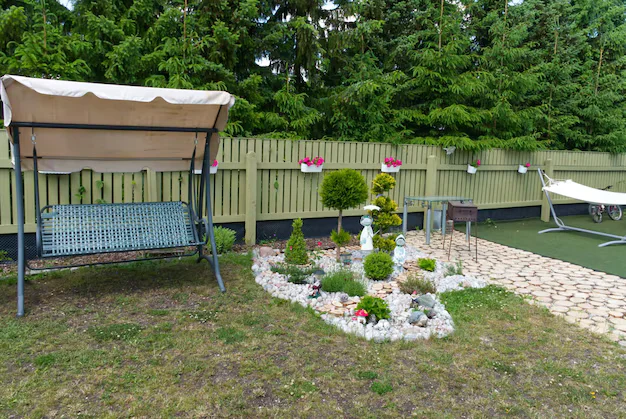
What is landscaping? The practice of creating, altering, and maintaining outdoor areas to make them more aesthetically pleasing, useful, and ecologically friendly is known as landscaping. To define landscaping, it includes planting trees, shrubs, flowers, adding decorative elements, and shaping the land. It enhances the appearance and usability of both residential and commercial properties. In homes, landscaping boosts curb appeal and provides a relaxing space. In business settings, it creates a welcoming environment and can improve property value. This article will explore whats landscaping, its types, benefits, and key tips for creating beautiful outdoor areas.Understanding What is Landscaping? Landscaping is the art and science of modifying the visible features of an outdoor area—such as a yard, garden, or commercial property—to make it more attractive, functional, and sustainable. It involves designing, planning, and implementing both natural and man-made elements into an outdoor space.Definition of LandscapingThe definition of landscaping is the process of arranging and modifying land areas to enhance their aesthetic appeal and usability. This includes the integration of plants, terrain shaping, water features, lighting, fences, pathways, and other elements.Hardscaping vs. SoftscapingLandscaping typically involves two key components: Hardscaping: This includes built features including patios, sidewalks, retaining walls, decks, roads, and other non-living landscape components. These are typically made of stone, concrete, wood, or metal and serve structural or decorative purposes. Softscaping: This includes the living, organic elements like grass, flowers, shrubs, trees, and soil. Softscaping adds color, texture, and life to the landscape and changes more frequently with seasons and growth. Both hardscaping and softscaping work together to create a balanced and visually appealing outdoor environment.Landscaping vs. GardeningWhile landscaping and gardening are closely related, they are not the same: Landscaping is broader and involves both design and construction elements. It includes hardscaping, softscaping, drainage systems, and often requires professional planning. Gardening is more focused on the cultivation and care of plants, such as planting flowers, vegetables, or maintaining lawns and flower beds. It is often considered a subset of landscaping. Historical ContextLandscaping has roots going back thousands of years. Ancient civilizations like the Egyptians, Persians, and Chinese developed intricate gardens and structured outdoor spaces, reflecting cultural, religious, and aesthetic values. The concept evolved through Renaissance Europe and continues today with a blend of ecological awareness and artistic design.You can also read about landscape installation in Bay area.Benefits of Landscaping Understanding whats landscaping is goes beyond just making your yard look nice. The definition of landscaping involves designing and modifying outdoor spaces to enhance their appearance, functionality, and environmental impact. A well-designed landscape offers a wide range of benefits that extend to the environment, property value, health, and everyday comfort.Environmental Benefits Erosion Control: Proper landscaping stabilizes the soil, especially on slopes or uneven terrain, preventing runoff and soil loss. Improved Air Quality: Plants absorb carbon dioxide and release oxygen. Trees and shrubs also filter pollutants from the air. Biodiversity Support: Native plants and diverse landscaping attract pollinators like bees and butterflies, as well as birds and small wildlife, supporting a healthy ecosystem. Aesthetic & Property Value Boosts Curb Appeal: A thoughtfully landscaped yard creates a welcoming first impression, making homes more visually appealing. Increases Home Value: Studies show that attractive landscaping can increase property value by up to 15%. Buyers are often willing to pay more for a home with a professionally designed outdoor space. Health & Well-being Mental Relaxation: Being in a well-landscaped environment reduces stress, anxiety, and promotes a sense of calm. Encourages Outdoor Activity: Landscaped yards make outdoor spaces more enjoyable, motivating people to spend more time outside for exercise, play, or socializing. Functional Benefits Noise Reduction: Trees, shrubs, and fences can act as natural sound barriers, reducing street and neighborhood noise. Shade & Energy Efficiency: Strategically placed trees and structures can provide shade, lowering indoor temperatures and reducing energy costs. Privacy: Landscaping elements like hedges, trellises, or fences can offer privacy without the need for solid walls. you can read about What Happens to Your Lawn During Cold Weather? Types of Landscaping To understand the different types, it’s good to first know what’s landscaping. The definition of landscaping is changing and shaping outdoor spaces by adding things like plants, trees, walkways, and other features. There are many types of landscaping, each with its own purpose and style.Residential LandscapingThis is landscaping done around homes. It includes front yards, backyards, gardens, and spaces for relaxing or playing. Homeowners usually choose designs that are easy to take care of and look nice year-round.Commercial LandscapingThis type is for businesses, office buildings, hotels, or shopping centers. Keeping the area tidy and hospitable for guests and clients is the aim.Hardscape ElementsThese are the non-living parts of landscaping. They include: Patios – Outdoor areas for sitting or eating Walkways – Paths made from stone, brick, or concrete Retaining Walls – Walls that hold soil in place, often used in sloped areas Softscape ElementsThese are the living parts of landscaping, like: Plants – Flowers, shrubs, and bushes Trees – For shade, beauty, or privacy Grass – Covers open ground and gives a fresh, green look Xeriscaping (Drought-Resistant Landscaping)Water-efficient plants are used in this kind of landscaping. It’s great for dry areas and helps save water. Cactus, succulents, rocks, and gravel are common in xeriscaping.Sustainable LandscapingThis focuses on using natural resources wisely. It includes collecting rainwater, using native plants, reducing waste, and planting trees to cool the area and reduce energy use.Theme-Based LandscapingThis type follows a certain style or look. Some examples are: Zen Gardens – Simple, peaceful spaces with rocks, sand, and a few plants Tropical – Lush plants, palm trees, and bright flowers Modern Minimalist – Clean lines, simple designs, and fewer plants Ideas & Options for Landscaping If you’re wondering what is a landscaping, it’s all about designing outdoor spaces in a way that makes them more useful and pleasant to look at. Whether you’re working on your front yard or backyard, there are plenty of creative and practical options to choose from—no matter your budget, time, or style.Front Yard vs. Backyard Ideas Front

How to Install a Paver Walkway
Uncategorized

How to Install a Paver Walkway

Installing a paver walkway is one of the most rewarding ways to enhance the look and feel of your outdoor space. Whether you’re designing a charming path through your garden or a solid, stylish walkway leading to your front door, this project offers both beauty and functionality. Installing pavers for walkway areas is a smart investment that adds curb appeal and long-term durability. In this guide, you’ll learn exactly how to install a paver walkway with confidence and care, step by step. Why Should You Install a Paver Walkway?Before we get into the nitty-gritty of how to install paver walkway, let’s discuss the reasons why this project is worth considering. Aesthetic Appeal: A well-designed walkway can completely change the look of your yard, giving it a polished and inviting appearance. Increased Property Value: Properly installed pavers not only improve your outdoor space but can also increase the market value of your home. Durability: Paver walkways are built to last, able to withstand heavy foot traffic, weather changes, and the test of time without cracking like traditional concrete. Customizable Options: Whether you’re looking for sleek, modern lines or rustic charm, installing a paver walkway allows you to select the perfect materials to match your style. Materials You Will Need for Installing a Paver WalkwayBefore you get started, it’s important to have all the necessary tools and materials. Here’s what you’ll need for Bay area paver installation for walkway: Pavers: Choose the material and design that complements your outdoor space. Whether it’s classic brick, cobblestones, or concrete pavers, select pavers that suit both the look and durability you need. Gravel Base: This is the foundation of your walkway, providing stability and drainage. The gravel should be coarse and compacted well. Sand: Fine sand is needed for leveling the surface and filling the gaps between the pavers. Landscape Fabric: This fabric helps keep weeds at bay, ensuring that your walkway remains clean and clear. Edging Material: To ensure your pavers stay in place, you will need some type of edging material such as metal or plastic. Compactor: This tool helps compact the gravel and sand layers, ensuring that everything is level and stable. Rubber Mallet: This will allow you to tap the pavers into place without damaging them. Step-by-Step Guide on How to Install a Paver Walkway1. Plan and Mark the PathStart by planning the route of your walkway. Using a garden hose or spray paint, outline the path where you want your pavers to go. Make sure the path is straight or gently curved, depending on your design preference. Be sure to mark the width and length accurately to avoid any errors later on.2. Excavate the AreaThe next step in installing a paver walkway is excavation. You’ll need to dig out the pathway to a depth of about 4-6 inches, depending on the size of your pavers. The depth is important for providing enough room for your gravel base and sand layer.Ensure the surface has a slight slope to facilitate proper drainage, as this will help prevent puddles and flooding on your walkway.3. Lay the Gravel BaseOnce the area is prepared, it’s time to lay the gravel. Spread a 3-4 inch layer of gravel over the excavated area. Use a rake to level it, and then compact it using a plate compactor. This ensures that the gravel is stable and won’t shift over time. The gravel acts as the drainage system for your walkway, keeping the pavers in place while allowing for proper water flow.4. Add Landscape FabricLay landscape fabric over the compacted gravel. This fabric will help keep weeds from growing through your pavers. It also helps separate the gravel from the sand layer, preventing the two from mixing over time.5. Spread the Sand LayerOn top of the landscape fabric, add a thin layer of sand (about 1 inch). This sand layer will act as a leveling base for your pavers and make it easier to adjust them as you lay them down. Use a rake to level the sand, ensuring it’s evenly spread across the path.6. Start Installing the PaversNow it’s time for the fun part—installing pavers for walkway! Start at one end of the walkway and place the first paver gently into the sand. Continue placing each paver next to the previous one, leaving small gaps between them for the sand to fill.As you go along, make sure that each paver is level and aligned. Use a rubber mallet to gently tap the pavers into place, ensuring they’re snug and secure. If necessary, cut pavers to fit at the edges using a paver cutter or wet saw.7. Fill the Gaps with SandOnce all your pavers are in place, it’s time to fill the gaps between them. Pour some polymeric sand (or regular sand) over the surface, and sweep it into the joints using a broom. This sand will prevent weeds from growing and keep the pavers tightly in place.After sweeping the sand into the joints, use a plate compactor to press the sand into the gaps and make sure everything is even and compacted.8. Final TouchesOnce the walkway is complete, give everything one final sweep to remove any excess sand from the surface. Inspect the walkway for any uneven pavers or gaps that need to be addressed. Adjust any pavers that may have shifted during the process.you can read about How to Install a Paver DrivewayCommon Issues to Avoid When Installing a Paver WalkwayWhile laying paver walkway can be a rewarding project, there are a few common mistakes to avoid: Improper Slope: If your walkway doesn’t have a proper slope, water will accumulate on the surface, potentially damaging the pavers or creating a muddy mess. Inadequate Base Layer: A weak gravel or sand base can cause the pavers to shift or settle unevenly over time. Ensure that the gravel is compacted thoroughly. Skipping the Edging: Without proper edging, the pavers may shift or become misaligned. Always use an edging material to secure the edges. ConclusionInstalling a paver walkway is

How to Install Landscape Lighting
Uncategorized

How to Install Landscape Lighting Like a Pro

There’s something undeniably magical about a well-lit outdoor space. That soft glow lining a garden path, the way shadows play off tree trunks, and the warm light highlighting your home’s best angles—it all adds up to an atmosphere that’s not just beautiful, but deeply welcoming. Whether you’re enjoying a quiet evening outside or hosting friends after sundown, the right lighting turns your yard into an experience.But landscape lighting isn’t only about aesthetics. It improves safety, guides guests, deters intruders, and extends the time you can enjoy your outdoor space. When done right, it blends form and function in the most stunning way possible.So, how to install landscape lighting that not only looks great, but performs beautifully for years to come? It starts with a clear plan and the right strategy. From selecting the best fixtures to thoughtfully placing each light, every step contributes to the final glow that brings your landscape to life.In this guide, we’ll show you exactly how to install landscape lighting with purpose—from design inspiration to installation tips—so your outdoor space isn’t just lit, it’s transformed. Why Landscape Lighting MattersBefore we get into the technical side of landscape lighting Bay area installation, it’s important to recognize the why behind it: Curb Appeal: Thoughtfully placed lights elevate the look of your home’s exterior. Safety: Path and step lighting prevent tripping hazards after dark. Security: A well-lit yard can deter intruders and make your property feel safer. Extended Use: Lighting allows you to enjoy your outdoor space well into the evening. With these benefits in mind, let’s explore how to install landscape lighting step-by-step.Step 1: Plan Your Landscape Lighting LayoutBefore any wires are cut or lights are bought, start with a clear lighting plan.Tips for Planning: Map Out the Area: Identify key areas like pathways, driveways, garden beds, trees, and architectural features. Determine Purpose: Is the goal ambiance, safety, or accent lighting? This will help you choose the right fixtures. Consider Light Placement: Avoid placing lights directly in people’s eyes. Use angles and indirect lighting to create softness. This is the brainstorming phase of your landscape lighting install. Take your time to sketch the area and mark where you want each light fixture to go.Step 2: Choose the Right Fixtures and BulbsNot all outdoor lighting is created equal. Choosing the proper fixtures will impact the quality, durability, and design of your project.Common Fixture Types: Path Lights: Ideal for walkways and garden borders. Spotlights: Used for uplighting trees or architectural features. Well Lights: Recessed into the ground for a sleek, modern look. Deck and Step Lights: Enhance safety and style on stairs and platforms. When selecting fixtures, make sure they’re rated for outdoor use. For bulbs, opt for LEDs as they’re energy-efficient, long-lasting, and come in various color temperatures to suit your desired look.This stage is critical to a successful landscape lighting install, so don’t rush it.Step 3: Gather Tools and MaterialsOnce you’ve selected your fixtures, it’s time to gather all the necessary materials for installing landscape lighting. Here’s what you’ll typically need:Tools: Shovel or trenching tool Wire stripper Drill (if mounting lights on walls or decks) Multimeter (for voltage testing) Materials: Low-voltage transformer Outdoor-rated cable Light fixtures and bulbs Waterproof wire connectors Mounting stakes or hardware This step ensures you’re fully prepared before starting your landscape lighting installation project.Step 4: Install the TransformerMost residential outdoor lighting systems use low-voltage electricity for safety and energy efficiency.Installation Steps: Mount the Transformer: Place it near an outdoor GFCI outlet. Connect to Power: Plug the transformer into the outlet. Run Main Line Cable: This will carry power from the transformer to your fixtures. When learning how to install landscape lighting, understanding how the transformer works is vital. It reduces your household voltage (typically 120V) down to a safer 12V for outdoor use.Step 5: Lay Out and Connect the LightsNow the fun part begins—setting out the fixtures and making connections.Here’s How: Place the Fixtures: Set them on the ground in your planned spots. Lay the Cable: Run the wire alongside the fixtures. Make the Connections: Use waterproof connectors to attach the fixtures to the cable. Test the System: Turn on the power and ensure each light is working properly. This part of the landscape lighting installation requires attention to detail. Always test connections before burying any wires.Step 6: Bury the Cable and Secure FixturesOnce you’re confident the system is working, it’s time to secure everything in place. Bury the Wire: Dig a shallow trench (about 6 inches deep) and lay the cable inside. Mount Fixtures: Secure path lights with stakes and mount deck or wall lights using screws. Adjust Angles: Tilt spotlights to highlight plants or structures precisely. Proper cable management ensures safety and keeps your landscape lighting install looking neat and professional.Step 7: Fine-Tune the Lighting EffectsAfter dark, go outside and assess the lighting. This is where the magic happens! Adjust Angles: Modify the direction of spotlights or path lights. Control Brightness: Some transformers have dimmers or timers you can tweak. Check for Shadows or Glare: Move or re-aim lights to fix unwanted effects. A well-executed install landscape lighting job should create soft, ambient glows—not harsh, blinding beams.Step 8: Maintain Your Landscape LightingInstalling landscape lighting is only part of the journey. Maintenance is key to keeping it looking and functioning like new.Maintenance Tips: Clean Fixtures: Dirt or leaves can block light output. Check for Damage: Replace bulbs or connectors as needed. Inspect Cables: Look for signs of wear, chewing (by critters), or disconnection. By doing periodic checks, your landscape lighting install will remain in top condition year-round.you can read about Are String Lights Best for Patio Lights? Value of Professional Landscape Lighting InstallationWhen it comes to installing landscape lighting, experience, precision, and design expertise matter. A well-lit outdoor space isn’t just about placing a few lights in the ground—it’s about creating balance, enhancing safety, and highlighting the best features of your landscape with intention.Working with a professional lighting specialist ensures: Safe Electrical Work: Proper installation minimizes risks and follows all safety standards. Clean,

11 Beautiful Front Yard Landscaping Ideas for Different House Styles
Uncategorized

11 Beautiful Front Yard Landscaping Ideas for Different House Styles

When it comes to creating a welcoming exterior, your front yard plays a pivotal role. Whether you’re looking to add curb appeal or make your space more functional, front yard landscaping offers endless possibilities. The beauty of landscaping lies in its ability to match the house style, creating harmony between your home and its surroundings. But how do you choose the best landscaping ideas for the front of your house? In this article, we’ll explore 11 Beautiful Front Yard Landscaping Ideas for Different House Styles that cater to various house designs.Our Proven Landscape Lighting Process 1. Modern Minimalist Landscaping Ideas for Front YardsModern architecture is all about clean lines and minimalism, and this should reflect in your front yard as well. Opt for simple, geometric shapes, monochromatic color schemes, and low-maintenance materials. Choose modern front yard landscaping ideas such as concrete pavers, sleek stone walkways, and trimmed hedges to complement your home’s sharp, contemporary look.Tip: Incorporate drought-tolerant plants like succulents or grasses that require minimal upkeep and provide a clean, fresh look.Why it works: A minimalist front yard aligns with modern design by focusing on simplicity and functionality, perfect for urban or contemporary homes.you can read about Transform Your Yard with Professional Lawn Installation2. Classic Cottage Landscaping for a Timeless AppealFor homeowners with charming cottage-style homes, soft landscaping ideas work wonders. Use a mix of perennial flowers, climbing vines, and neatly trimmed shrubs. Think of blooming roses, lavender, and ivy growing along a rustic wooden fence. This style is perfect for homeowners who want to evoke a quaint, cozy vibe while maintaining low-maintenance landscaping for the front of the house.Tip: Add a small stone path leading to the front door to give your home that storybook charm.Why it works: The softness and variety of plants provide texture and a welcoming atmosphere, while also being easy to manage and maintain.3. Small Front Yard Landscaping IdeasIf you’re working with a smaller space, don’t worry! There are plenty of small front yard landscaping ideas that can make a big impact. When considering landscaping ideas for the front of the house, choose compact plants like boxwoods, small ornamental trees, or colorful flowers that don’t overwhelm the space. Adding a vertical garden can also maximize space while keeping the area vibrant and fresh.Tip: Use narrow planter boxes or hanging baskets for flowers, creating a vertical garden effect without using up precious ground space.Why it works: By focusing on smaller, manageable plants and vertical elements, you can still make your front yard look lush without sacrificing valuable space. These landscaping ideas for the front of the house are ideal for compact areas.4. Front Yard Landscape Ideas for Mediterranean HomesIf you own a Mediterranean-style home, your front yard should reflect the timeless beauty of this architectural style. Use warm tones in the Bay Area landscape dsign, like terracotta pots, stone pathways, and lush greenery. Olive trees, lavender, and citrus plants fit perfectly with this style, while their fragrant aromas add to the ambiance. These front yard landscape ideas work beautifully with Mediterranean homes, offering a timeless aesthetic.Tip: Incorporate a small water feature, such as a fountain, to complement the Mediterranean theme.Why it works: The vibrant colors and textures create an inviting, exotic atmosphere, perfect for homes with stucco exteriors and tile roofs. These front yard landscape ideas enhance the charm of Mediterranean homes. If you’re looking for inspiration, these ideas are great for transforming your front yard into a welcoming oasis.These front yard landscape ideas are sure to add character and elegance to any Mediterranean-style home.5. Sustainable Landscaping Ideas for Front YardsEco-conscious homeowners will appreciate sustainable landscaping ideas that are both beautiful and functional. Focus on using native plants that thrive in your climate and require minimal water. Incorporate mulch to retain moisture and reduce water usage, and consider adding a rain garden to manage stormwater. These landscaping ideas for front yard​ are ideal for homeowners looking to create an eco-friendly space.Tip: Create a xeriscaped garden with drought-tolerant plants like agave, yucca, and ornamental grasses for a water-wise front yard.Why it works: Sustainable landscaping reduces environmental impact, saves on water bills, and creates a beautiful front yard that’s easy to maintain.6. Rustic Landscaping Ideas for Front YardsFor homes with a rustic, country vibe, embrace natural materials like wood, stone, and gravel. A rustic front yard landscape can include features such as a wood picket fence, stone walkways, and large, boulder-like plants. This style works well with traditional homes or log cabins.Tip: Incorporate wildflowers and native grasses for a natural look that blends well with the environment.Why it works: The rustic materials create a homely, welcoming atmosphere, while the natural look makes maintenance a breeze.7. Tropical Front Yard Landscaping IdeasFor those lucky enough to live in a warm climate, tropical landscaping ideas can turn your front yard into a paradise. Think palm trees, hibiscus, bird of paradise, and colorful plants that add a tropical flair. This works well for homes with an open, airy feel and coastal or island-style designs.Tip: Use bold, colorful flowers and large tropical plants to create a vibrant, lush environment.Why it works: Tropical landscaping creates a relaxed, vacation-like vibe, perfect for homeowners looking to make a bold statement with their front yard.8. Zen-Inspired Landscaping Ideas for Front YardsZen-inspired front yards focus on creating a tranquil, peaceful environment. Incorporate rocks, gravel, water features, and minimal plantings to create a serene and meditative space. Bamboo, ferns, and moss can add lush greenery, while a small pond or stone lanterns complete the look.Tip: Use smooth pebbles or stepping stones to create a peaceful pathway through your Zen garden.Why it works: A Zen-inspired front yard creates a sense of calm and balance, ideal for homeowners looking to unwind and reconnect with nature.9. Front Yard Landscaping with a Focus on PrivacyIf your front yard is overlooked by neighbors or pedestrians, consider adding elements that provide privacy while maintaining curb appeal. Tall hedges, privacy fences, or bamboo screens can create a private sanctuary in your front yard without sacrificing beauty.Tip:

How to Clean Solar Lights
Uncategorized

How to Clean Solar Lights for Maximum Brightness

Outdoor solar lights are an excellent way to illuminate your pathways, gardens, and outdoor spaces while saving energy. However, to ensure they work at their best, regular cleaning and maintenance are essential. Over time, dirt and debris can block sunlight, reducing the light’s ability to charge efficiently. Dust, pollen, and grime may also build up on the solar panel, affecting its performance.To keep your lights shining brightly, it’s important to clean them periodically. Regular maintenance can also extend their lifespan, ensuring you enjoy a beautiful, well-lit outdoor space year-round.Follow this step-by-step guide to how to clean solar lights for maximum brightness and efficiency. The Need for Regular Solar Light Maintenance Solar lights offer a sustainable, renewable way to light up your outdoor spaces. However, over time, dust, grime, and environmental debris can hinder their performance. If left uncleaned, the buildup on solar panels reduces their ability to absorb solar energy, which leads to dim or non-functional lights. This guide is designed for homeowners and landscape enthusiasts who are looking for clear, step-by-step instructions on how to clean solar lights, ensuring your lights remain bright and efficient.Understanding Solar Lights and Their ComponentsBefore diving into the cleaning process, it’s essential to understand the different components of solar lights and why each part requires specific maintenance attention.Solar Panels: The Heart of the SystemSolar panels are designed to absorb sunlight and convert it into electrical energy. Dust, dirt, and environmental pollutants can accumulate on the panels, significantly reducing their efficiency. Regular cleaning outdoor solar lights and paying attention to solar panel maintenance are crucial for optimal performance. Key Component: Solar panels capture solar energy, making them critical for your lighting system. Maintenance Insight: Regular cleaning solar light panels is necessary to maximize the absorption of sunlight. Battery and Electrical ComponentsSolar lights come equipped with rechargeable batteries that store energy during the day and power the lights at night. Solar light battery care is important because battery efficiency declines if batteries become corroded or worn out. Battery Care: It’s vital to check the batteries for corrosion regularly and replace the batteries, if needed. Maintenance Tip: Follow solar light cleaning tips​ to ensure that the battery compartment is free of debris that might lead to malfunction. Light Fixtures and LensesThe outer fixtures and lenses of solar lights are exposed to the elements and can accumulate grime, water spots, and other debris. This not only impacts the aesthetic appeal but also the overall efficiency of the lights. Aesthetic and Functionality: Clean your solar outdoor lights regularly to maintain both appearance and performance. Maintenance Reminder: Use solar light cleaning tips​ to ensure that the light lenses remain crystal clear. Why Regular Solar Light Cleaning Matters Regular maintenance and cleaning are not merely about aesthetics—they play a significant role in the performance and longevity of your solar lights.Impact on Energy EfficiencyDust and debris can significantly reduce the amount of solar energy captured by the panels. Inadequate energy absorption leads to reduced brightness and shorter operational hours. By adopting the best way to clean solar lights, you ensure that every ray of sunlight is effectively captured and converted into power. Solar Panel Efficiency: Regular cleaning improves the performance of your cleaning solar light panels. Energy Optimization: Maintaining clean solar panels means more efficient use of renewable energy. Preventing Hardware DeteriorationExposure to environmental elements such as rain, wind, and dust can cause parts of the solar lights to corrode or deteriorate over time. Regular cleaning minimizes the buildup of corrosive materials, extending the lifespan of both the solar panels and the battery. Long-Term Savings: Regular solar light cleaning reduces repair and replacement costs over time. Maintenance Strategy: Use solar light cleaning tips​ to protect your investment in renewable energy lighting. Enhancing Outdoor AestheticsClean, well-maintained solar lights not only function better but also enhance the beauty and safety of your outdoor spaces. Whether you’re hosting a garden party or enjoying a quiet evening outdoors, well-maintained lights add a warm, inviting glow to your landscape. Visual Appeal: Regular cleaning outdoor solar lights ensures your home’s exterior looks pristine. Landscape Impact: Incorporate cleaning solar light panels in your routine for better overall outdoor lighting. Essential Tools and Preparation for Solar Light CleaningBefore you begin the cleaning process, it’s important to gather the necessary tools and follow safety precautions. This section outlines everything you need to successfully clean your solar lights using proven methods and solar light cleaning tips​.Tools You Will Need Soft Cloth or Microfiber Towel: Ideal for gently wiping away dust and dirt. Mild Soap or Soapy Water: Essential for loosening stubborn grime. Water Spray Bottle: Useful for applying water evenly over the panels. Soft-Bristled Brush: Helps in dislodging debris from hard-to-reach areas. Gloves: Protect your hands from dirt and chemicals. Ladder or Step Stool: Necessary for reaching higher-mounted solar lights safely. Safety Precautions Turn Off the Lights: Always ensure that the solar lights are switched off before cleaning to prevent electrical issues. Avoid Harsh Chemicals: Use only mild soap or a gentle cleaning solution, as harsh chemicals can damage solar panels. Check the Weather: Ensure you clean on a dry day to avoid water spots and ensure a streak-free finish. Personal Safety: Use a stable ladder or step stool if the lights are mounted high and ensure you have assistance if needed. Using these basic tools and following these safety guidelines will help you execute solar light cleaning efficiently and safely.Step-by-Step Guide: How to Clean Solar Lights In this section, we provide a detailed, step-by-step guide on how to clean solar lights effectively. By following these steps, you’ll discover the best way to clean solar lights and learn expert solar light cleaning tips​ along the way.Step 1: Turn Off and InspectBegin by switching off your solar lights to ensure safety. Inspect the lights to identify areas with heavy dirt buildup, such as the solar panels and battery compartments. This inspection will help you decide if there are any stubborn areas requiring extra attention. Inspection Tip: Look closely at the solar panels

How to Lay Pavers
Uncategorized

How to Lay Pavers: Easy Step-by-Step Installation Guide

Creating a beautiful and durable outdoor space begins with mastering the best way to install pavers. Whether you’re designing a cozy patio for relaxation, a stylish walkway to enhance your landscape, or a sturdy driveway to boost your curb appeal, proper installation is key to ensuring lasting, professional results.If you’ve ever wondered how to install pavers or what the best way to install pavers is, you’re in the right place. This comprehensive guide will take you step-by-step through the entire process—from preparation to the finishing touches—helping you craft an outdoor space that is both functional and visually stunning. Why Choose Pavers?Pavers are one of the most versatile and stylish materials for outdoor hardscaping. But what makes them such a great choice?Durability – Unlike traditional poured concrete, pavers resist cracking and can withstand heavy foot traffic and vehicle loads. Their interlocking design allows for slight movement, reducing the risk of unsightly fractures. By understanding how to lay pavers properly, you can ensure they remain stable and durable for years to come.Aesthetic Appeal – Available in a variety of colors, shapes, and textures, pavers can be customized to match any design preference, from classic brick patterns to modern, sleek layouts. Knowing the best way to lay pavers enhances both their visual appeal and functionality.Easy Installation & Repair – Laying pavers is a manageable DIY project. If one gets damaged, you can easily replace individual pavers instead of redoing an entire surface—saving time and money. However, understanding how to place pavers properly is key to preventing issues like shifting or uneven surfaces.Superior Drainage – Pavers allow water to drain between the joints, preventing pooling and minimizing erosion, making them an excellent choice for areas prone to heavy rain.Increased Property Value – A well-designed paver patio, walkway, or driveway enhances curb appeal and boosts your home’s market value, making it a smart investment for homeowners.Step 1: Prepare the Area Pre-Demolition and ExcavationBefore laying pavers, you need to prepare the ground. Mark the area with stakes and string to ensure you have a clear layout. If there’s any existing concrete or grass, remove it entirely. The excavation depth should be around 6-8 inches for walkways and patios, or up to 12 inches for driveways. Using a shovel, dig out the designated area to the proper depth. If the soil is loose or sandy, you may need to dig deeper and add extra base material for stability.Grade the AreaThe ground should slope slightly away from buildings to allow proper drainage. A 1-inch drop for every 4 feet is a good rule of thumb. Proper grading prevents water from pooling on the surface, which can lead to erosion or instability over time.Compact the Sub-baseUsing a plate compactor, firmly press down the soil to create a stable foundation. This prevents shifting over time. If you don’t have access to a plate compactor, you can use a hand tamper, but it may take more effort to achieve a firm base.Step 2: Add a Base Layer of Gravel (Road Base)A 1-inch layer of sand ensures a smooth surface for paver placement. Use a straight board to screed the sand evenly. Pour the sand over the gravel base and spread it evenly. Use a long, straight piece of wood or a level to smooth out the surface. Avoid walking on the sand once it’s leveled to prevent shifting. Pro Tip: Opt for coarse, washed sand rather than fine sand, as it provides better stability for the pavers. Step 3: Add Bedding SandA 1-inch layer of sand ensures a smooth surface for paver placement. Use a straight board to screed the sand evenly. Pour the sand over the gravel base and spread it evenly Use a long, straight piece of wood or a level to smooth out the surface Avoid walking on the sand once it’s leveled to prevent shifting Pro Tip: Opt for coarse, washed sand rather than fine sand, as it provides better stability for the pavers.Step 4: Start Adding the Paving Stones To ensure uniformity, lay all full-sized pavers before cutting edge pieces. Working in small sections ensures that each area remains level before moving on to the next.Best Way to Install Pavers: Work in small sections and periodically use a rubber mallet to tap them into place. Remember, certain patterns, such as herringbone or basket weave, may require extra time and precision during placement.Step 5: Continue Laying Full Paving Stones To ensure uniformity, lay all full-sized pavers before cutting edge pieces. Working in small sections ensures that each area remains level before moving on to the next.Best Way to Install Pavers: Work in small sections and periodically use a rubber mallet to tap them into place. Remember, certain patterns, such as herringbone or basket weave, may require extra time and precision during placement.Step 6: Cut Small Pieces to Fit Edges For border areas or odd spaces, you’ll need to cut pavers to fit. Use a masonry saw or chisel to cut pavers to the correct size. Always wear protective gear when cutting pavers. Measure and mark the paver where the cut needs to be made. Use a masonry saw with a diamond blade for clean cuts. Alternatively, use a chisel and hammer for a more traditional cutting method. Double-check measurements before cutting to ensure a precise fit.Step 7: Install Edging for Stability Edging is essential to keep the pavers from shifting over time. You can use: Plastic or metal edging secured with stakes. Concrete edging for a more permanent solution. Edging not only enhances the overall look but also helps keep pavers in place and prevents them from spreading out over time.Step 8: Sweep Dry Sand Into Gaps To lock the pavers in place, sweep fine polymeric sand into the joints. This helps prevent weeds and enhances stability. Use a push broom to spread the sand evenly. Work the sand into the gaps between pavers. Mist the surface lightly with water to activate the binding agent. How do I install pavers securely? Using polymeric sand helps prevent

Top 12 Cement Patio Ideas
Uncategorized

Top 12 Cement Patio Ideas

A cement patio is one of those things in your home’s exterior makeover that offers numerous potentials to transform your outdoor living while being affordable. Whether you have a small outdoor space in your home, an entire wide backyard, or just an elongated sideyard, cement offers numerous designs to choose from to transform your cement patios into an aesthetically pleasing environment. Below is an in-depth guide on some cement patio ideas to create amazing patios out of simple slabs in your home’s exterior remodeling process. Why Choose a Cement Patio?before we proceed to talk about some really inspiring cement patio ideas, there are some reasons why cement remains such a popular option: Durability: Cement is also resistant to extreme weather conditions, heavy furniture, and foot traffic. Affordability: Cement is less costly in comparison to stone, bricks, or composites. Design Flexibility: Cement has unlimited flexibility in designs, from stamp patterns to geometrics. Low Maintenance: It requires occasional washing to maintain its cleanliness, in addition to having occasional sealing to maintain its integrity. Keeping in mind all these advantages, homeowners enthusiastically explore cement patio ideas to create beautiful spots in their backyards.1. Modern Minimalist Cement PatiosIf you like clean, polished, elegant designs with neutral-colored themes, then minimalist patios would definitely be some of the most popular cement patio designs for you to explore. Minimalistic designs incorporate simplicity with elegant style.Key Features: Built-in seating or planters Basic, modern outdoor seating Opaque colors like off-white, light gray. These patterns will also work well with soft greenery, which is perfect for cement patio landscaping for those homeowners looking for a clean yet natural environment.Why It WorksMinimalist designs incorporate the natural beauty of cement. When combined with modern décor elements, this becomes one of the most timeless backyard cement patio ideas you can implement.2. Stamped Cement Patterns That Mimic Natural MaterialsStamped cement offers you the appearance of high-cost materials with less expenditure. It is one of the most flexible cement patio ideas for homeowners looking to create charm on their property with less outlay.Popular Stamped Styles: Stone or slate patterns Brick textures Wood Plank Finishes Cobblestone designs These patterns are most sought after by homeowners in their quest for cement paver patios, due to their ability to create patterns simulating individual cement pavers.Landscaping TipInstall flower beds or some decorative gravel along the borders. These will merge your patios with nature, thereby creating elegant cement patio landscaping ideas.3. Geometric Cement Paver Patio IdeasGeometric patterns provide a sleek, modern alternative to traditional patio designs. Cement pavers in interesting designs provide aesthetic appeal to patios.Pattern Styles to Try: Large square pavers Rectangular stepping stones Hexagon Paver Layouts Checkerboard designs with grass in between These geometric patterns have now become some of the most popular cement paver patio ideas, especially in modern houses. These patterns can also be combined with cement patio design ideas to create a more artistic environment.4. Cozy Backyard Cement Patio Ideas With Fire PitsFire pits will readily convert any patio into an ideal entertaining arena. Cement stands out as one of the most secure materials to work with, especially in areas surrounding fire features.Ideas for Fire Pit Integration: Round recessed fire pits “Square modern fire pits” Built-in cement bench seating Fire bowls on raised cement platforms This is especially effective in cooler climates, providing you with useful and beautiful cement patio designs for backyard to enjoy during extended outdoor living.Landscaping EnhancementGravel, plants in pots, or small shrubs to create an ideal backdrop for cement patio landscaping ideas.you can read about Benefits of Adding an Outdoor Patio to Your Home5. Outdoor Kitchen or BBQ Zone on a Cement PatioFor house owners who enjoy throwing parties, creating either an outdoor kitchen or grilling bar is one among those indulgent cement patio ideas.Design Options: Cement base for grill island Outdoor bar seating Cement prep stations with storage Cement is heat-resistant, hard, and durable. It is perfect for outdoor cooking. It is also one characteristic that works to its advantage in modern cement patio design ideas.Extra TouchAdd pot herbs, a pergola, or string lights for some extra character.6. Multi-Level Cement Patio Design IdeasMultilevel patios provide an interesting method for extending living space for those with sloping yards or for those wanting to create a striking appearance.How to Use Multi-Level Designs: Move dining to the highest floor, with relaxation space below Add wide cement steps to connect levels Utilize built-in planters in-between terraces Lighting to indicate land elevations It is one of the most modern designs for cement patios, ideal for larger yards or homes requiring more definition.7. Mix Cement With Grass or GravelBy incorporating soft or textured materials in close proximity to cement, it helps to soften the appearance.Great Ways to Incorporate This Idea: Grass-filled stepping stone pathways Cement pads with gravel surroundings. Paving Alternating with Turf Cement grids with low ground cover plants Mixed style looks one of the most fresh cement paver patio ideas, especially in environmentally correct or modern designs.8. Creative Cement Patio Landscaping IdeasLandscaping is necessary to provide character, comfort, and natural beauty to your patio. It achieves balance and softness by incorporating plants with cement.Landscaping Ideas to Try: Tall planters surrounding outdoor patios Flower beds lining the perimeter Low shrubs for natural boundaries Vertical gardens or trellises Rocks with decorative designs, pebbles, or mulch These elements will improve almost all cement patio ideas, giving your outdoor living environment a complete appearance.9. Painted or Stained Cement Patio SurfacesColoring will drastically change the appearance of cement patios. Stains and paints provide endless creativity.Color Options: Earthy browns and tans Slate gray to deep charcoal Terracotta Reds Soft creams and beige Strong patterns such as stenciled tile designs These designs will increase your outdoor look, or they can be paired with other cement patio designs in your backyard.10. Covered Cement Patio Ideas (Pergolas & Roof Extensions)It adds shade, comfort, and protection from either sun or rain. Your patio now serves functions all-year-round.Cover Options Include: Wooden pergolas Copper Pergola Shades with Fabric Roof extensions extending from one end Retractable awnings

11 Stunning Side Yard Landscaping Ideas
Uncategorized

11 Stunning Side Yard Landscaping Ideas

The small, frequently disregarded area next to your house may be totally transformed with these 11 Gorgeous Side Yard Landscaping Ideas. The majority of people either ignore it completely or utilize it only to conceal garbage cans, but with a little imagination, this space can become one of your yard’s most attractive features.Although creating a side yard can be difficult because it is typically small and shaded, the best ideas can come from the constraints. You can make this tiny area both functional and aesthetically pleasing with the correct strategy.Do you need inspiration to get going? You may maximize your area with these 11 Gorgeous Side Yard Landscaping Ideas. There are easy methods to make your side yard come to life, whether your vision is a lush green area, a modest seating alcove, or a tranquil garden path. 1. Side Yard Pools for a Luxurious EscapeDo you feel that your little yard isn’t big enough for something special? Rethink your assumptions! With the right side yard design ideas, even the smallest space can become a peaceful and stylish escape.One of the most refreshing landscaping ideas for side yard spaces is adding a modest pool—think stock tank or plunge pool. This simple addition can instantly turn your side yard into a personal retreat.Surround the pool with tropical plants, a minimalist wooden deck, and a couple of cozy lounge chairs. Keep the layout open and uncluttered to ensure the area feels light and welcoming. These side yard design ideas are all about maximizing comfort while keeping the vibe relaxed and natural.2. A Shady Side Yard HideawayBy adding comfortable chairs and some shade, you can transform your side yard into a tranquil little retreat. A pergola can provide a cool, organic shade from the sun when adorned with climbing vines or hanging plants.To make it feel cozy and fashionable, add a modest seating area with cozy cushions, a straightforward wooden deck, and a few contemporary concrete pavers. In addition to being attractive, this arrangement provides you with a peaceful, comfortable space to rest and decompress just outside your door. 3. Design an Outdoor Lounge AreaYou don’t need a sprawling backyard to create a fun and inviting hangout space—your side yard has all the potential! With the right side yard design ideas, you can turn this narrow space into a charming retreat perfect for relaxing or chatting with friends.One of the most enjoyable landscaping ideas for side yard areas is setting up a small fire pit. Pair it with string lights and cozy seating to instantly create a warm, social vibe. For added style, consider installing a herringbone-patterned brick floor that adds texture and character.A low hedge can offer just the right amount of privacy, while soft, low-growing plants keep the space lush and inviting. These simple yet effective side yard design ideas bring both personality and practicality to your home’s overlooked corners.4. Incorporate a Stock Tank PoolUpgrading your side yard with a stock tank pool is stylish and reasonably priced, especially if you have limited room. These little, stylish pools are ideal for lounging on hot days.Plant shrubs or leafy plants around the pool to give it a more secluded and tranquil feel. To give it a tidy, completed appearance, you may also add a little wooden deck or a clean stone border. Do you want to make it even more useful? For added convenience and speedy rinses, place an outdoor shower close by. It’s an easy way to make your own little haven in the backyard. 5. Define Outdoor “Zones” with Hardscape and GravelYou can divide zones in your side yard using different ground materials, such as grass, pavers, or gravel, rather than walls or fences. In this manner, you may have a small dining area, a garden path, and a comfortable fire pit setting all in one area without feeling crowded. It is easy to maintain and has a lovely appearance. 6. Install a Pergola for Shade and StyleA pergola is a fantastic way to give your side yard some shade and flair. It is ideal for growing vines or hanging plants and helps define the area. You can use woven screens, planters, or outdoor drapes to keep the air flowing while blocking strong sunlight to make it more cozier. 7. Optimize for Al Fresco DiningEnjoy dining al fresco? Your side yard can be transformed into a charming outdoor eating space by adding a modest table and chairs. For a playful, cozy touch, add string lights, a vibrant rug, and perhaps a little herb garden. To add even more appeal to outdoor dining, consider adding a pizza oven, fire pit, or portable grill. 8. Go for a Zen-Inspired RetreatA few easy, organic touches can transform your side yard into a serene area. Smooth stones, bamboo screens, and a tiny fountain can create a tidy, Zen-like atmosphere in your yard. Include a stone path, a meditation bench, or even a little rock garden. It will seem calming and enchanted with soft lights, such as lanterns or LED strips, especially at night. 9. Add Container Gardens for VersatilityIf you enjoy plants but don’t want to invest in full landscaping, container gardening is ideal. Grow flowers, herbs, or even veggies like tomatoes and peppers in vibrant pots, hanging baskets, or tiered plant stands. It gives your side yard color and vitality and is adaptable and little maintenance.10. Create a Multi-Purpose HardscapeYou may create a fashionable, low-maintenance side yard that accomplishes it all with materials like concrete, brick, or stone. To create an area that is both aesthetically pleasing and functional, add raised plant beds, built-in benches, or stone pathways. This kind of arrangement is particularly effective in places with lots of sunshine and little precipitation.11. Install Outdoor Lighting for a Magical TouchYour side yard might feel quite different with proper illumination. Lanterns, walkway lights, and string lights provide a pleasant, inviting glow in addition to keeping things safe. For energy savings, look at LED or solar possibilities. To create a mystical, welcoming atmosphere that you will want to

9 Landscaping Ideas Designers Use to Create Privacy
Uncategorized

9 Landscaping Ideas Designers Use to Create Privacy

9 Landscaping Ideas Designers Use to Create Privacy can help homeowners enjoy their backyard without prying eyes. Creating a private outdoor space is essential for relaxation, entertaining guests, and establishing a peaceful retreat. Whether you have a small patio or a spacious garden, the right landscaping elements can turn your yard into a secluded oasis. Privacy in outdoor spaces is crucial for comfort and functionality. By incorporating smart landscaping techniques, you can effectively shield your backyard from neighbors and unwanted distractions. From lush greenery to stylish fences and creative outdoor structures, there are multiple ways to enhance privacy while maintaining aesthetic appeal. In this guide, we explore 9 Landscaping Ideas Designers Use to Create Privacythat will enhance both aesthetics and functionality. 1. Layered Planting for Natural PrivacyOne of the best landscape privacy ideas is to use a mix of trees, shrubs, and plants to create a lush, layered look. This technique not only blocks views but also enhances your garden’s natural beauty. Designers often recommend a combination of evergreen shrubs, tall grasses, and flowering plants to create a visually appealing yet effective barrier. Layered planting provides depth and ensures that privacy is maintained year-round.2. Privacy Hedges for a Green BarrierTall hedges are a classic choice for privacy landscaping ideas. Evergreens such as arborvitae, boxwood, and holly provide year-round coverage, ensuring privacy in every season. For added texture, mix in fast-growing species like privet or laurel to create a dense, natural fence. Hedges also help absorb noise and create a serene outdoor atmosphere.3. Installing Privacy ScreensFor those seeking quick and modern landscape ideas for privacy, installing decorative privacy screens is a stylish solution. Wooden lattice panels, bamboo screens, or metal partitions can be strategically placed to block unwanted views while adding a design element to your yard. These screens can be combined with climbing plants for a more natural and aesthetically pleasing barrier.4. Using Pergolas and TrellisesPergolas and trellises covered in climbing vines are effective for increasing privacy without making a space feel closed off. Wisteria, ivy, and jasmine are excellent climbing plants that offer a blend of shade, privacy, and fragrance. Pergolas can be enhanced with hanging plants or curtains to provide additional seclusion.5. Fence Upgrades for Maximum SeclusionA well-designed fence is a key component of landscaping privacy ideas. Instead of a plain wooden or vinyl fence, opt for one with horizontal slats, decorative cutouts, or a mix of materials like stone and wood for added visual interest. Staggered or louvered fencing can allow for airflow while maintaining privacy. 6. Water Features for Sound and PrivacyIn addition to visual barriers, water features such as fountains, waterfalls, or bubbling ponds help mask noise, making them a great addition to privacy landscaping ideas. This is especially useful for homeowners living in noisy neighborhoods or near busy roads. The soothing sound of running water adds tranquility while enhancing the ambiance of the outdoor space.7. Outdoor Curtains for Flexible CoverageFor patios and pergolas, outdoor curtains provide a stylish and versatile way to increase privacy. These weather-resistant fabrics can be drawn closed when needed and opened to let in light and air when desired. Outdoor curtains are available in various colors and patterns, allowing homeowners to personalize their space while maintaining privacy.8. Raised Planters and Green WallsIf ground space is limited, consider raised planters filled with dense greenery or a living wall covered in ferns, succulents, or trailing plants. These vertical elements serve as natural screens while adding beauty to the Bay area landscape design. Green walls are an excellent way to incorporate additional privacy while maximizing greenery in compact outdoor spaces. 9. Strategic Lighting to Maintain Privacy at NightWhile designing ideas for privacy landscaping, lighting plays a crucial role. Soft, indirect lighting like pathway lights, lanterns, or uplighting on trees creates a cozy ambiance while preventing harsh glare that can expose your space to neighbors. Smart lighting solutions can be customized to enhance privacy while maintaining security and visibility.ConclusionIncorporating these landscape privacy ideas into your backyard will not only enhance your outdoor space but also offer the seclusion you need. Whether you choose lush greenery, elegant fences, or modern privacy screens, the key is to blend aesthetics with functionality. Adding privacy to your outdoor space can also increase property value and improve overall enjoyment of your home. Thoughtfully planned landscaping creates a welcoming and serene environment, perfect for relaxation and entertaining guests. By investing in privacy solutions, you ensure a long-term enhancement to your Bay area landscape that benefits both beauty and usability.If you need expert assistance in transforming your backyard into a private retreat, Lakota Design Group specializes in customized landscaping privacy ideas to suit your style and needs. Our team of professionals can help you design and implement the perfect solution for your outdoor space, ensuring both privacy and visual appeal. Contact us today to bring your vision to life and create a backyard sanctuary tailored to your needs!FAQsWhat are the best plants for landscape privacy ideas?Evergreen shrubs, tall grasses, and fast-growing trees like arborvitae or bamboo are great choices for natural privacy.How can I create privacy in my backyard without a fence?Use layered planting, privacy hedges, trellises with climbing vines, or decorative privacy screens to achieve a secluded space.What is the fastest way to add privacy to a backyard?Installing privacy screens, outdoor curtains, or using fast-growing plants like privet or laurel can quickly enhance backyard privacy.Are pergolas good for privacy landscaping ideas?Yes, pergolas with climbing plants or outdoor curtains provide shade and privacy while maintaining an open, airy feel.How do water features help with privacy?Water features like fountains and waterfalls mask noise, creating a peaceful ambiance while enhancing privacy in outdoor spaces.What type of fencing is best for landscape ideas for privacy?Solid wood, vinyl, or louvered fences offer maximum seclusion, while decorative designs add style and functionality.

10 Backyard Ideas on a Budget
Uncategorized

10 Backyard Ideas on a Budget

Looking to give your backyard a refresh without draining your wallet? Whether you’re working with a sprawling yard or searching for small backyard ideas on a budget, the right mix of creativity and strategy can completely elevate your outdoor space. These affordable backyard ideas go beyond simple fixes—they help you build a personalized, welcoming environment that fits your lifestyle without straining your finances. If you’re looking for backyard ideas on a budget that make a real difference, these 10 ideas will spark your inspiration and get you started today. 1. Create Defined Zones for FunctionalityOne of the most effective low budget backyard ideas is creating defined areas for different activities. Divide your backyard into zones like an outdoor dining area, kids’ play zone, a vegetable garden, or a lounge spot. Use low-cost Bay area landscape deesign tools like gravel, pavers, wood chips, or outdoor rugs to separate spaces. Even in small backyard ideas on a budget, this concept makes your yard feel organized and intentional. Adding outdoor furniture or planters helps each area serve its unique purpose while giving your yard a polished look.2. Build a DIY Patio or DeckSkip the high contractor fees and create your own patio with affordable materials like gravel, pavers, or reclaimed bricks. Wooden pallets can also be transformed into a small deck, making it a popular choice for small backyard ideas on a budget. Patios and decks make great gathering spots and add usable square footage outdoors. By choosing cost-effective materials, this upgrade becomes one of the top affordable backyard ideas with a high impact-to-cost ratio.3. Try Vertical GardeningDon’t let a lack of space stop your green thumb. Vertical gardening uses walls, fences, or trellises to grow plants upward, saving floor space and improving visual interest. Hang terracotta pots, build pallet gardens, or install a DIY green wall. It’s a favorite among small backyard ideas on a budget because it creates lush greenery without requiring a large footprint. Use this method to grow herbs, flowers, or even vegetables in a visually appealing way.4. Repurpose and Upcycle Outdoor DecorUpcycling is one of the smartest backyard ideas on a budget because it leverages what you already have. Repurpose old chairs, wooden crates, or shipping pallets into garden seating, plant stands, or storage. Paint old metal buckets for colorful planters. Browse thrift stores or yard sales for affordable, character-rich finds. This DIY approach not only cuts costs but adds personal flair and sustainability to your yard.5. Build a DIY Fire PitNothing brings people together like a cozy fire pit—and you can build one with inexpensive materials like retaining wall blocks, river stones, or bricks. This feature is ideal for both larger and small backyard ideas on a budget, adding warmth and ambiance to any setting. Surround it with repurposed seating like tree stumps or secondhand chairs. It’s one of the most classic low budget backyard ideas for year-round enjoyment.6. Refresh with a Furniture MakeoverBefore you buy new outdoor furniture, consider updating what you already have. Use exterior-grade paint or wood stain to refresh tables and chairs. Replace weathered cushions or sew your own from discounted fabric. These small changes are incredibly effective in affordable backyard ideas, giving your space a new look for minimal cost. Even tired plastic furniture can be revived with paint and clever styling.7. Light it Up with DIY Outdoor LightingLighting is key to setting the mood outdoors. String lights, solar-powered lanterns, pathway lights, and LED rope lighting are all budget-friendly ways to enhance your yard. Layer lighting types to create atmosphere and function. This idea fits seamlessly into all backyard ideas on a budget, from romantic garden setups to practical path lighting. Lighting can elevate any evening hangout without increasing your utility bill. 8. Embrace Container GardeningContainer gardening gives you complete flexibility in what you plant and where. Great for renters or those with limited space, it’s one of the most versatile small backyard ideas on a budget. Use mismatched pots, repurposed buckets, or decorative containers to plant herbs, flowers, or even vegetables. This method adds color, life, and personalization to any backyard corner. Plus, it makes rearranging or seasonal planting easy and affordable.9. Add a DIY Water FeatureCreate a peaceful focal point in your yard with a homemade water feature. Use a large planter, waterproof bowl, or recycled items paired with a solar-powered pump to build a small fountain. These low budget backyard ideas bring a sense of calm and luxury without requiring major plumbing or professional installation. The sound of running water enhances relaxation and makes your yard feel like a tranquil escape.10. Design an Outdoor Entertainment AreaBring the fun outside by building an entertainment zone. Hang a white sheet for movie nights, install a Bluetooth speaker system, or set up a DIY bar with repurposed materials. Add bean bags or folding chairs to keep it casual and functional. Whether it’s family game night or a gathering with friends, this is one of the most enjoyable backyard ideas on a budget. Even small backyard ideas on a budget can include space for laughter and connection.you can read about Top 8 Backyard Ideas without GrassFinal ThoughtsTransforming your outdoor area doesn’t have to be expensive. These 10 backyard ideas on a budget prove that with a little creativity, resourcefulness, and elbow grease, you can create an inviting, personalized backyard. Whether you’re after affordable backyard ideas for entertaining or looking for low budget backyard ideas for gardening and relaxation, these tips work in any space. Even if you’re working with small backyard ideas on a budget, these suggestions will help you maximize style, function, and comfort without overspending.At Lakota Design Group, we specialize in turning vision into reality—whether it’s a full landscape overhaul or strategic upgrades that align with your budget. Ready to bring your dream backyard to life? You don’t have to do it alone—reach out today and let’s design the backyard of your dreams, one budget-friendly step at a time!FAQs1. How can I make my backyard look good on a budget?You can

Our Client's Reviews

Copyright © 2025 | Localpro1 | All Rights Reserved.

English