Author name: admin

Landscaping

How To Install Pavers On Dirt

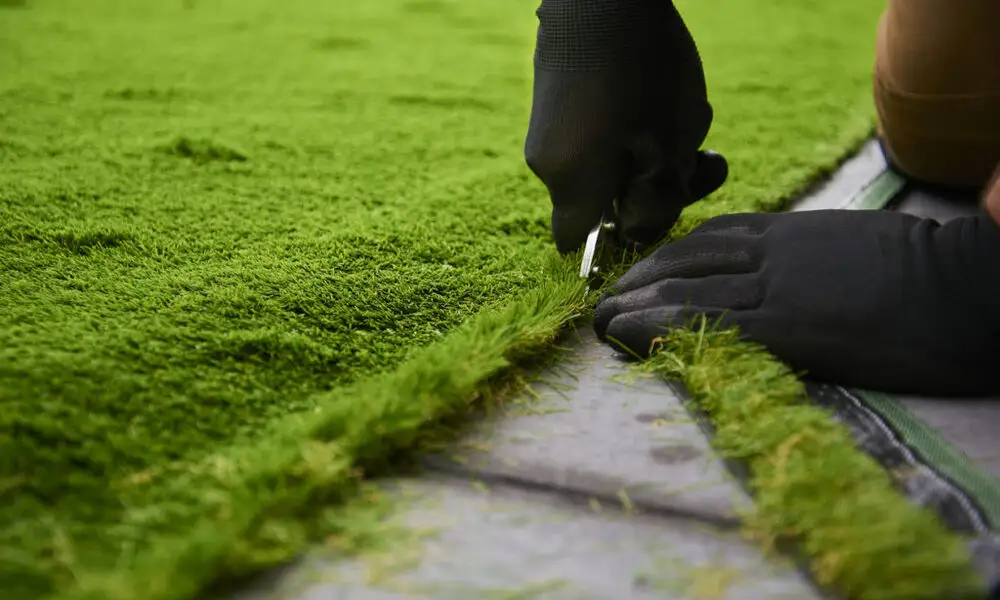
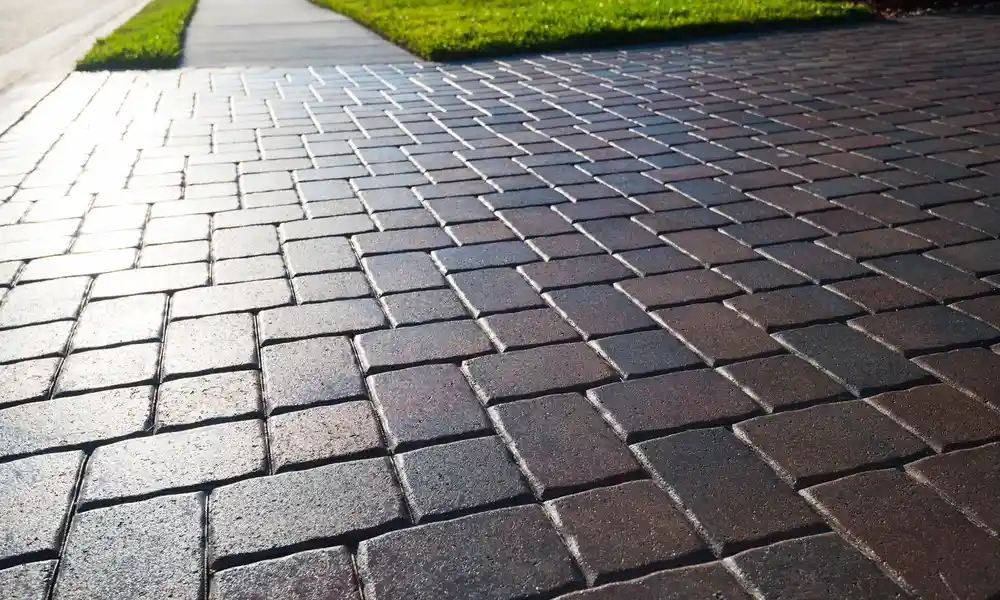
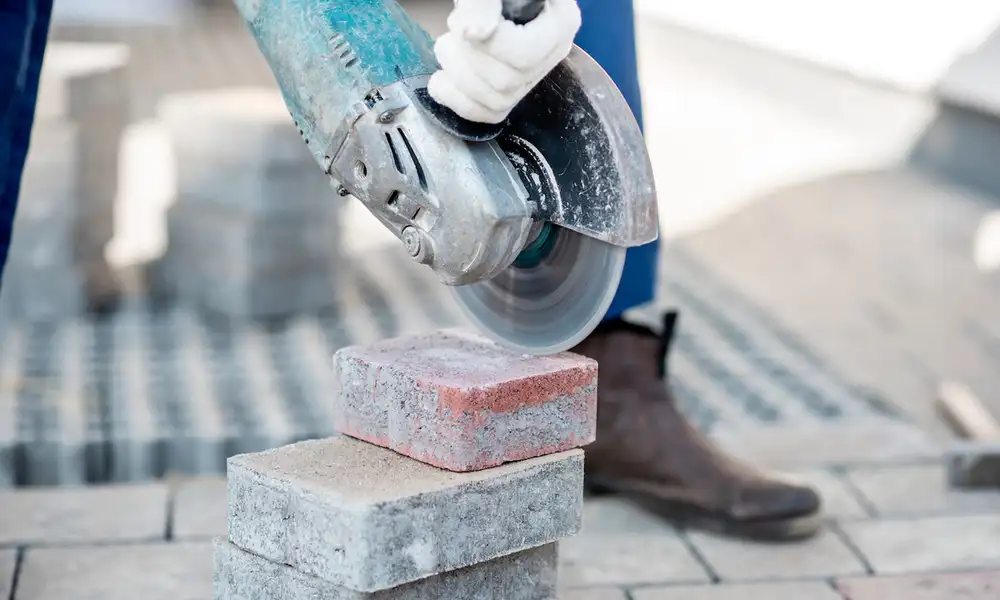
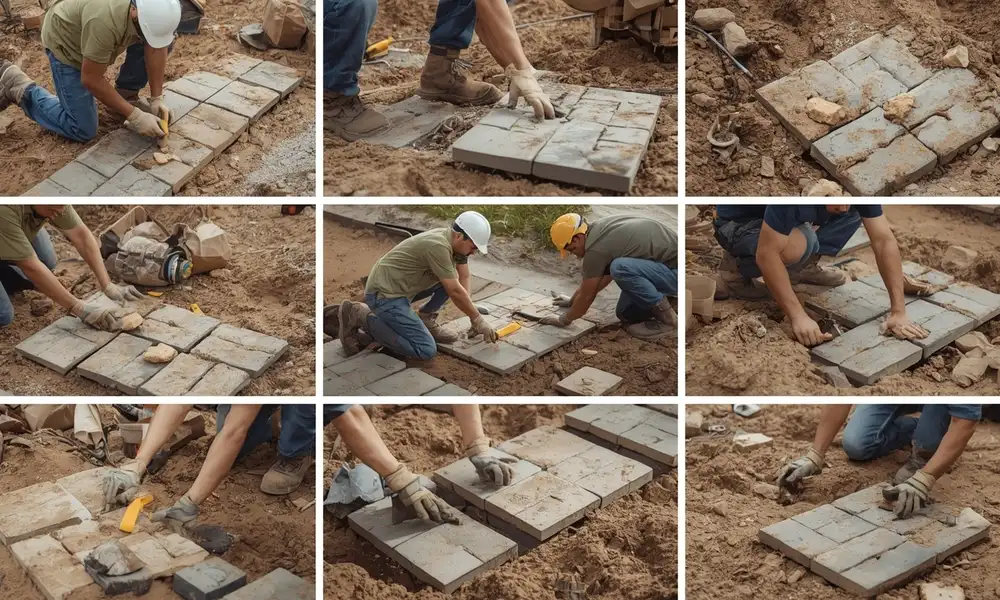
How to install pavers on dirt is a straightforward yet rewarding project that lets you create a functional and attractive outdoor surface without the need for concrete or extensive groundwork. By installing pavers on dirt, you can achieve a budget-friendly and quick upgrade to patios, walkways, or garden areas perfect for homeowners who enjoy hands-on, DIY-friendly projects.The process of setting pavers in dirt may seem simple, but the secret to a long-lasting, professional finish lies in careful planning, proper leveling, and solid base preparation. With the correct strategy, you may design a long-lasting and aesthetically pleasing area that improves your landscape for many years to come.Understanding Paver Installation on Dirt What “Installing on Dirt” Really MeansWhen someone says pavers installed on dirt, it typically means placing the stones directly over compacted natural soil without adding a gravel or sand layer underneath. Dirt base: Uses native soil as the foundation. Concrete base: Pavers are set on a rigid, poured concrete slab. Sand base: Pavers rest on a compacted layer of gravel topped with sand, allowing better leveling and drainage. How Dirt Differs from Concrete or Sand Bases Concrete Base: Strong, permanent, and stable but less forgiving for drainage and repairs. Sand Base: Flexible, drains well, and allows for easy paver replacement. Dirt Base: Quick and inexpensive, but less stable and more prone to shifting over time. Pros of Installing Pavers on Dirt Low Cost: No need for extra base materials. Faster Installation: Skips excavation for gravel or sand layers. Simple DIY Option: Minimal tools and skills required. Cons of Installing Pavers on Dirt Poor Stability: Dirt can shift or erode, causing uneven surfaces. Weed Growth: Gaps between pavers are more vulnerable to weeds. Water Drainage Issues: Moisture can pool, leading to sinking or mud. Shorter Lifespan: More frequent repairs or re-leveling needed compared to sand or concrete bases. You may read How To Cut Pavers?Essential Equipment for Laying Pavers on Dirt Measuring & Planning Tools Tape Measure: Ensures accurate layout and alignment of your paver pattern. Soil Preparation Tools Shovel & Rake: For clearing debris, leveling the dirt, and shaping the base area. Level: Helps keep the pavers even and prevents tripping hazards. Tamper or Plate Compactor: Compresses the dirt for a firmer, more stable surface. Paver Placement Tools Rubber Mallet: Taps pavers into place without cracking them. Paver Spacers (Optional): Keeps uniform gaps for a clean, consistent layout. Base & Support Materials Landscape Fabric: Reduces weed growth and helps with soil stability. Pavers: Choose sizes like 12×12 pavers or other shapes to fit your design. Gravel or Crushed Stone (Optional): Improves drainage and adds extra stability under the dirt base. Safety Gear Checklist Work Gloves: Protects hands from blisters and sharp edges. Safety Glasses: Shields eyes from flying debris or dust. Knee Pads: Reduces strain while working at ground level. Steel-Toe Boots: Provides foot protection from dropped pavers. Dust Mask: Useful when working in dry, dusty conditions. How to Install Pavers on Dirt | Step-by-Step Guide If you’re looking for a budget-friendly, quick way to upgrade your outdoor space, laying paver stones on dirt is a great option. While it won’t be as durable as a sand or concrete base, it works well for small patios, walkways, or garden paths. Here’s how to do it right.Step 1: Measure and PlanBefore setting pavers in dirt, decide on the layout and size of your project. Use a tape measure to mark the exact dimensions, then outline the area with stakes and string to keep your lines straight.Step 2: Clear and Level the GroundRemove grass, roots, rocks, and any debris. Rake the area smooth so the pavers can sit evenly. A clean surface is key for a stable installation.Step 3: Compact the SoilFor a sturdy base when laying paver stones on dirt, use a hand tamper or plate compactor to press the soil down. This step reduces shifting and uneven settling over time.Step 4: Lay Landscape Fabric (Optional)Placing landscape fabric over the compacted dirt can help prevent weeds from growing between your pavers.Step 5: Arrange the PaversStart at one corner and work outward. Use paver spacers if you want uniform gaps. Make sure your pavers align with your planned pattern.Step 6: Level and AdjustUse a rubber mallet to gently tap each paver into place. Keep checking with a level to maintain a flat surface.Step 7: Fill GapsSweep fine gravel, crushed stone, or sand into the joints between pavers. This locks them in place and adds extra stability.Step 8: Final CheckWalk over the area to ensure no pavers rock or shift. Adjust as needed so the surface is even and secure.How to Lay 12×12 Pavers on Dirt Larger pavers, like 12×12-inch concrete slabs, require extra care when installed on dirt. Their weight can cause sinking if the base isn’t prepared correctly, and their size makes alignment even more important. Here’s what to keep in mind.Special Considerations for Larger Pavers Extra Soil Compaction: Larger pavers put more pressure on the soil, so use a plate compactor for maximum stability. Even Base Surface: Any dips in the dirt will cause the paver to rock or settle unevenly. Level carefully before placing. Edge Support: Install paver edging or bury the edges slightly to prevent lateral movement over time. Tips for Alignment and Preventing Sinking Measure Twice: Use a tape measure and string lines to keep the rows perfectly straight. Check Level Frequently: Every few pavers, place a level across the surface to avoid gradual tilting. Add a Thin Gravel Layer (Optional): Even though you’re still laying paver stones on dirt, a 1-inch layer of compacted gravel beneath each 12×12 can reduce sinking. Tap, Don’t Force: Use a rubber mallet to set each paver gently forcing them can shift the base. Ideal Patterns for 12×12 Pavers on Dirt Grid Pattern: Simple and symmetrical, best for patios and walkways where straight lines are key. Diamond Layout: Turn the pavers at a 45° angle for a unique, upscale look. Stepping Stone Path: Space them apart for a garden path,

How to Install Artificial Grass on Concrete Step-by-Step Guide
Landscaping

How to Install Artificial Grass on Concrete

How to install artificial grass on concrete is a smart and cost-effective way to transform dull, lifeless surfaces into vibrant, low-maintenance outdoor spaces. Whether you have a patio, balcony, or even an old driveway, installing artificial grass on concrete can instantly improve the look and feel of your area. Many homeowners and businesses choose synthetic grass on concrete because it’s durable, comfortable underfoot, and requires minimal upkeep. In this guide, we’ll walk you through the essential tools and materials you’ll need, explore the benefits of installing turf over concrete, and provide a clear, step-by-step process to help you achieve a flawless finish.Essential Tools and Materials Required for Installing Turf on Concrete When laying artificial grass on concrete, having the right tools and materials ensures a smooth installation and long-lasting results.Tools You’ll Need: Utility Knife or Turf Cutter – For trimming and shaping the artificial turf to fit your space. Measuring Tape – To measure the concrete area accurately before cutting your turf. Broom or Stiff Brush – For cleaning the surface and brushing the turf fibers upright after installation. Power Washer or Hose – To clean the concrete before laying artificial grass. Adhesive Applicator – For spreading outdoor adhesive or turf glue evenly. Materials You’ll Need: Artificial Grass Rolls – Choose high-quality turf suitable for outdoor use on concrete. Outdoor Adhesive or Turf Glue – To securely bond the artificial turf to the concrete. Shock Pad/Foam Underlay – Adds comfort, cushioning, and extra safety under the turf. Joining Tape – Used to connect multiple rolls of turf seamlessly. Silica Sand Infill (Optional) – Helps keep turf blades upright and adds weight for stability. You may read about How Much Is Turf Per Square Foot?Benefits of Installing Artificial Grass on Concrete 1. Low Maintenance Laying artificial grass on concrete eliminates the need for mowing, watering, or fertilizing. Once installed, your surface stays lush and green all year long with almost no upkeep just an occasional rinse or brush to keep it looking fresh.2. Durable and Long-Lasting Artificial turf on concrete is built to withstand constant use, making it ideal for busy households, rooftop decks, patios, and even commercial areas. Unlike natural grass, it won’t fade, thin out, or turn muddy with heavy foot traffic.3. Quick Transformation By laying artificial grass on concrete, you can instantly upgrade a dull, grey space into a vibrant and inviting green area. Whether it’s for a cozy backyard retreat, a play zone, or an outdoor dining spot, the transformation is immediate and visually striking.4. Safe & Comfortable SurfaceCompared to bare concrete, artificial turf atop concrete offers a softer, non-slip surface. This makes it safer for children, pets, and anyone who enjoys walking barefoot outdoors. Adding a foam underlay can enhance comfort even more.5. All-Weather Usability Rain or shine, your artificial turf on concrete remains functional and beautiful. It drains effectively, preventing water pooling and eliminating the mess of mud or slippery puddles perfect for year-round enjoyment.6. Versatile Design Options Laying artificial grass on concrete offers flexibility in design. You can cover the entire surface, create custom patterns, or combine it with pavers and decking to match your outdoor style.How to Install Artificial Grass on Concrete – Step-by-Step Guide Laying artificial grass on concrete is a quick way to turn a dull, hard surface into a lush, green, and usable space. Whether it’s for a patio, rooftop, or play area, following the right installation process ensures your synthetic grass on concrete looks great and lasts for years.Step 1: Prepare the Concrete SurfaceTo begin, thoroughly clean the concrete by removing dirt, debris, and moss using a power washer, broom, or stiff brush. Repair any cracks or uneven areas to create a smooth, stable foundation for your turf. A clean, level surface is essential for a professional finish.Step 2: Install a Shock Pad or Foam Underlay (Optional but Recommended)Adding a shock pad beneath your synthetic grass on concrete improves comfort, cushioning, and drainage. Lay the foam underlay across the area, cutting it to size with a utility knife. This step is especially beneficial for play areas and spaces where people will walk barefoot.Step 3: Measure and Cut the Artificial GrassRoll out your turf over the prepared surface. Measure carefully to ensure a perfect fit, then trim it with a sharp utility knife. Accurate cutting makes laying artificial grass on concrete look seamless and well-fitted.Step 4: Apply Adhesive and Secure the TurfUse an outdoor adhesive or turf glue to bond the grass to the concrete. Apply the adhesive evenly across the surface using an applicator, then press the turf firmly into place to ensure strong adhesion.Step 5: Join Turf Sections (If Needed)If your area requires multiple turf rolls, use joining tape and adhesive to connect them. Align the edges carefully to create a smooth, natural-looking seam.Step 6: Brush the Grass and Add InfillTo improve look, use a stiff broom to push the fibers upright after the turf is firmly in place. Add silica sand infill if desired it helps weigh down the synthetic grass on concrete, keeps blades upright, and adds stability.Step 7: Final Check and Maintenance TipsInspect the entire area for loose edges, bubbles, or uneven spots. Light maintenance, such as occasional brushing and rinsing, will keep your artificial lawn looking fresh and vibrant all year round.Why Choose Lakota Design Group for Installing Artificial Grass on Concrete When it comes to laying artificial grass on concrete, experience, precision, and quality matter. At Lakota Design Group, we combine over 49 years of landscaping expertise with a commitment to delivering beautiful, long-lasting results.1. Proven Expertise Our team specializes in installing synthetic grass on concrete for patios, rooftops, courtyards, and commercial spaces. We understand the unique challenges of concrete installations and know how to prepare the surface for optimal drainage, adhesion, and durability.2. Premium Materials We source only high-quality artificial turf, adhesives, and underlays to ensure your lawn not only looks stunning but also withstands heavy use and all weather conditions.3. Customized Solutions Every space is unique. We tailor each project to match

How to Seal Patio Pavers – Easy Step-by-Step Guide
Landscaping

How To Seal Patio Pavers

How to seal patio pavers starts with understanding that sealing is the process of applying a protective sealant over your paver surface to shield it from damage, stains, and wear. Whether you’re sealing concrete pavers or natural stone, this step locks in the beauty of your patio while protecting it from harsh weather, UV rays, and moisture. Sealing pavers not only enhances their color and gives them a rich, vibrant finish but also helps prevent weed growth between joints and makes cleaning much easier. By sealing patio pavers, you ensure your outdoor space stays attractive, durable, and low-maintenance for years to come.Is It a Good Idea to Seal Your Pavers? Protection from Damage and StainsWhen you seal patio pavers, you create a powerful shield against everyday wear and tear. This barrier helps prevent oil, food, and beverage stains from soaking in, while also blocking damage from rain, snow, and harsh sunlight. Over time, UV rays can cause pavers to fade and lose their original beauty, but paver sealing locks in the color and enhances the natural tones of the stone. The result is a patio or walkway that not only looks fresh but stays protected season after season.Reduced Weed and Moss GrowthA major perk of paver sealing is its ability to deter weeds, moss, and algae from growing between the joints. This not only keeps your outdoor space looking neat but also reduces the time and effort spent on maintenance. By sealing the joints with sand and applying the right sealer, you create a tight bond that helps prevent moisture from settling in—making it harder for unwanted growth to take hold and keeping your patio safe, clean, and visually appealing.Potential Drawbacks to ConsiderSealing isn’t a one-and-done process it’s an ongoing investment in your outdoor space. Depending on foot traffic, weather exposure, and the type of sealer used, you may need to reapply every 2–5 years. Additionally, using the wrong sealer or applying it too thickly can lead to a slippery surface when wet. Choosing a high-quality product and following correct application techniques are essential for safety, comfort, and lasting results.When Sealing is RecommendedSealing is especially beneficial in high-traffic areas such as driveways, walkways, and patios that see regular use. It’s also ideal for spaces exposed to heavy rain, frequent spills from outdoor dining, or direct sunlight that can cause fading. If you want to extend the life of your pavers, enhance their appearance, and cut down on maintenance, seal patio pavers to ensure they look their best for years to come.Here Are the Tools You Will Need to Seal Your Pavers Paver Cleaner & DegreaserBefore you seal patio pavers, a quality paver cleaner and degreaser help remove dirt, oil, and stains. This ensures the surface is ready for paver sealing and improves adhesion.Pressure WasherA pressure washer delivers a deep clean, washing away debris, weeds, and old residues. This step is crucial for a smooth and long-lasting finish when you seal patio pavers.Roller or SprayerTo apply the sealer evenly, use a roller for a controlled coat or a sprayer for faster coverage. Both methods work well for paver sealing, depending on your project size.Joint SandJoint sand fills the gaps between pavers, locking them in place and preventing weed growth. It also supports the structure before and after paver sealing.Paver SealerChoose between a water-based or solvent-based paver sealer. The right product protects against stains, fading, and weather while enhancing the natural look of your pavers.Safety GearWearing gloves, goggles, and a mask protects you from dust, chemicals, and fumes during cleaning and paver sealing, keeping the process safe and efficient.You may read How To Cut Pavers?How to Seal Patio Pavers in Five Easy Steps Step 1: Clean the Pavers ThoroughlyBefore sealing pavers, remove all dirt, weeds, moss, and stains using a paver cleaner and a pressure washer. Pay extra attention to oil spots or mildew, as these can prevent the sealer from bonding. A spotless surface is essential for a smooth, long-lasting finish.Step 2: Let the Pavers Dry CompletelyAfter cleaning, let the pavers dry for at least 24 hours or longer if the weather is humid. Any trapped moisture can lead to hazy patches, bubbling, or peeling, especially when sealing concrete pavers. Drying fully ensures the sealer penetrates and adheres properly.Step 3: Apply Joint Sand Between Paver GapsSpread fine joint sand over the surface, sweeping it into every gap until they’re completely filled. This not only locks the pavers in place but also reduces weed growth and prevents shifting. A stable base is key before sealing pavers for long-term durability.Step 4: Apply Sealer Evenly with Roller or SprayerChoose a water-based or solvent-based paver sealer based on your material and desired finish. Apply it evenly with a roller for precision or a sprayer for faster coverage. A consistent coat helps protect against stains, fading, and weather damage when sealing concrete pavers.Step 5: Let the Surface Cure Before UseFollow the manufacturer’s curing instructions, typically 24–48 hours, before walking or driving on the sealed area. This curing period allows the sealer to fully bond, ensuring your sealing pavers project delivers maximum protection and a beautiful, long-lasting finish.When to Call for Professional Help Large or Complex ProjectsIf you’re sealing pavers across a large patio, driveway, or commercial space, professional expertise ensures even application and long-lasting results. Large-scale jobs require specialized tools and high-grade sealers for maximum durability.High-End or Delicate MaterialsWhen sealing concrete pavers, brick, or natural stone, using the wrong product can cause damage or discoloration. Professionals know which sealers work best for each material to preserve both beauty and performance.Pavers in Poor ConditionIf your pavers have deep stains, heavy weed growth, or uneven surfaces, a pro can properly clean, repair, and prepare them before sealing. This guarantees the sealer bonds well and protects effectively.At Lakota Design Group, we bring over 49 years of hands-on experience in landscape design, paver installation, and sealing. From small residential patios to large commercial spaces, we deliver precision, beauty, and long-lasting protection.Protect and enhance your outdoor space contact Lakota Design

How to Cut Pavers: Step-by-Step Guide for Beginners
Landscaping

How To Cut Pavers

How to cut pavers is a crucial skill for achieving a clean, professional finish in outdoor hardscape projects. Pavers commonly made of concrete, brick, or stone are used to create durable and visually appealing surfaces for driveways, patios, walkways, and more. Whether you’re cutting concrete pavers to fit tight corners or need to cut a paver for curved edges, precision matters for both function and aesthetics.Poor cuts can lead to uneven gaps, instability, or a sloppy appearance. Essential tools, detailed cutting methods, and safety advice will all be covered in this guide. We’ll also cover when it’s best to call in a professional for more complex jobs.Tools Needed to Cut PaversThe proper instruments are necessary for precise, clean cuts. Depending on the material and type of cut, you may need one or more of the following: Hammer and Chisel – Ideal for simple or rough cuts on brick pavers. Circular Saw with Diamond Blade – Great for straight, precise cuts on concrete and stone pavers. Angle Grinder – Useful for detailed work and cutting curves. Wet Saw – Best for cutting concrete pavers with minimal dust and maximum precision. Safety GearAlways prioritize safety when you cut a paver: Goggles – To protect eyes from flying debris. Gloves – To ensure a firm grip and avoid injuries. Dust Mask – To prevent inhaling harmful dust, especially when dry cutting. A safer and more efficient cutting process is guaranteed when the right equipment and instruments are used.How to Cut Pavers (Step-by-Step Guide)Cutting pavers correctly ensures a clean finish and proper fit for your landscape project. Whether you’re installing a patio, walkway, or driveway, follow these steps for professional results.Step 1: Measure and Mark the PaverMeasure the space where the paver will be placed before you start cutting it. Mark the cut line on the paver clearly using a chalk line or straight edge. To guarantee a smooth fit, precise measurements are essential.Step 2: Choose the Right Tool Based on the Cut Type and MaterialThe tool you select depends on the material (concrete, brick, stone) and the type of cut (straight, curved, or corner). Common tools for cutting concrete pavers include: Angle Grinder – Best for smaller, precise cuts. Wet Saw – Ideal for smooth, clean cuts and reduces dust. Masonry Saw – Great for heavy-duty or larger projects. Always use a diamond blade for efficient cut concrete paver results.Step 3: Secure the Paver Before CuttingTo avoid movement and ensure safety, place the paver on a non-slip surface or clamp it down. A properly fastened paver lowers the chance of chipping or uneven edges and aids in control during the cut.Step 4: Make the Cut (Dry vs. Wet Cutting Methods)There are two main methods for paver cutting: Dry Cutting: Often done with an angle grinder. It’s faster but produces more dust. Use proper safety gear, including a dust mask and eye protection. Wet Cutting: Uses water to cool the blade and minimize dust. This method is cleaner and better for longer or more precise cuts, especially when you cut concrete paver materials. After cutting, smooth any rough edges with a masonry file or sanding block for a clean finish.Need help with professional paver installation or landscape design service in San Jose and nearby areas? Contact Lakota Design Group your experts in creating flawless outdoor spaces.How to Cut Concrete PaversCutting concrete pavers the right way ensures a professional look and long-lasting results in any hardscape project. Because of their durability and density, concrete pavers require the right tools and techniques to make clean, accurate cuts without cracking.Understanding Concrete Paver Durability and DensityConcrete pavers are incredibly resilient and made to endure years of wear, severe weather, and heavy traffic. However, this same density makes them tougher to cut than brick or natural stone. When performing paver cutting, using the wrong method can lead to cracking, chipping, or uneven edges.Best Tools for Cutting Concrete PaversTo cut concrete paver material effectively, use tools that can handle the hardness of concrete: Wet Saw with a Diamond Blade Ideal for clean, smooth, and precise cuts. The use of water helps cool the blade, reduce dust, and minimize the risk of cracks. Angle Grinder with a Diamond Blade Perfect for smaller or detailed cuts. It’s more portable and efficient for quick tasks, but produces more dust and requires a steady hand. Tips for Clean, Straight Cuts and Reducing Cracking Score First, Then Cut: For thicker pavers, lightly score the marked line before making a full cut. This helps guide the blade and reduces chipping. Secure the Paver: Clamp the paver or place it on a rubber mat to prevent movement during cutting. Go Slow and Steady: Rushing the process creates jagged edges and increases the chance of cracks. Let the blade do the work. Use Water When Possible: Especially with wet saws, water keeps the blade cool and the cut clean. It also helps reduce airborne silica dust. Smooth Edges After Cutting: Use a masonry file or sanding stone to remove sharp edges or imperfections. You may read Are concrete pavers good for patio?How to Cut Curves on Brick PaversCurves add elegance and fluidity to landscape designs. Whether you’re installing a winding garden path, custom edging, or a circular patio, learning how to cut a paver to fit a curve is essential for a smooth and professional-looking finish.Why Use Curves in Paver Designs?Curved lines in paver installations are more than just aesthetic—they: Soften hard edges in landscapes Create organic flow for walkways and patios Enhance visual appeal, especially in garden borders or circular designs Properly cutting pavers to follow a curve ensures that the design looks intentional, not forced.Step 1: Mark the Curved Line on the PaversLay your brick pavers in the desired area before cutting. Then: Use a flexible ruler, garden hose, or string to trace the curve. Mark the cut line clearly with chalk or pencil directly on each paver. For tighter curves, mark smaller, incremental changes across multiple pavers. Accurate marking ensures you only cut a

How to Anchor a Gazebo to Pavers Step by Step Guide
Landscaping

How To Anchor A Gazebo To Pavers

How to anchor a gazebo to pavers is a common question for homeowners looking to create a stable and secure outdoor space. When installing a gazebo on pavers, it’s essential to ensure it’s anchored properly to withstand wind and daily use. One effective method to anchor a gazebo to pavers is by using heavy-duty anchors or brackets that secure the frame to the surface. You can also drill directly into the pavers or use weight-based systems if you prefer not to damage the stone. Another strong option is to attach gazebo to concrete pads beneath the pavers, offering enhanced stability. The method you choose will depend on your paver type, gazebo weight, and local weather conditions. Anchoring ensures safety and extends the lifespan of your structure. Whether you’re hosting gatherings or just relaxing outdoors, a properly secured gazebo gives you peace of mind.Why Is Gazebo Anchoring Important? Preventing Structural DamageInstalling a gazebo on pavers without proper anchoring can lead to shifting or collapse over time. Gazebos are large structures that rely on secure footing. Without gazebo anchors for pavers, even slight movement can cause structural stress, cracked pavers, or damage to the frame. Anchoring prevents this by keeping the structure firmly in place.Enhancing Safety During Wind or StormsA strong wind or sudden storm can easily turn an unanchored gazebo on pavers into a safety hazard. Unsecured structures may tip or collapse, posing serious risk to people and nearby property. Using the right gazebo anchors for pavers ensures your outdoor structure remains stable and safe during unpredictable weather.Ensuring Longevity and StabilityAnchoring helps extend the life of your gazebo on pavers by minimizing movement and wear over time. Proper anchoring distributes weight evenly and keeps the structure balanced, reducing stress on joints and materials. This added stability supports the gazebo’s performance year-round, especially in high-traffic or exposed areas.Local Code & HOA Compliance ConsiderationsMany local building codes and HOAs require gazebos to be anchored properly, especially when placed on hardscapes like pavers. Installing gazebo anchors for pavers not only meets these standards but also avoids potential fines or the need for future modifications. Always check your local regulations before installing a gazebo on pavers to stay compliant.You may read How Much Does Landscape Design Cost?Supplies Needed to Secure a Gazebo to Pavers Masonry Anchors or Paver Anchor KitsMasonry anchors are one of the most reliable options for securing a gazebo on pavers. These anchors drill directly into the pavers, locking the structure in place. Many homeowners prefer complete gazebo anchors for pavers kits that include all the necessary hardware and instructions for safe installation.Sandbags or Weight Plates (Alternative Option)If you’re looking for a no-drill or temporary solution, sandbags or weight plates can help stabilize your gazebo on pavers. While not as secure as permanent gazebo anchors for pavers, they add downward pressure to reduce movement in mild weather conditions.Heavy-Duty Brackets or Base PlatesUsing heavy-duty brackets or base plates allows you to connect the gazebo legs directly to the pavers. These components work well with gazebo anchors for pavers, offering extra durability and resistance against shifting. They’re ideal for long-term installations.Polyurethane Adhesive (No-Drill Option)For those who want to avoid drilling, polyurethane adhesive offers a strong bond between the gazebo base and pavers. This no-drill option is suitable for lighter structures and works best in areas with minimal wind. However, it’s not a substitute for proper gazebo anchors for pavers in high-stress environments.Optional Tools: Hammer drill, wrench, measuring tape, levelTo install a gazebo on pavers correctly, you’ll need optional tools like a hammer drill for masonry anchors, a wrench for tightening bolts, and measuring tape and level for accurate placement. Having the right tools ensures the job is done efficiently and safely.Step-by-Step Guide to Anchoring a Gazebo on Pavers Step 1: Choose the Right Anchoring Method (drill or no-drill)Before you anchor a gazebo to pavers, decide whether you’ll use a drilled or no-drill method. Drilled options like masonry anchors or brackets provide the most stability, especially if you want to attach a gazebo to concrete or heavy pavers. No-drill options like polyurethane adhesive or sandbags are better for temporary setups or rental properties.Step 2: Position the Gazebo CorrectlySet the gazebo exactly where you want it before securing it. Make sure it’s aligned and level on the paver surface. Proper placement is essential before you anchor a gazebo to pavers, as repositioning later can weaken the installation or damage the pavers.Step 3: Mark Anchor Points on PaversWith the gazebo in place, mark where each leg meets the ground. These will be your drill or adhesive points. If you plan to attach the gazebo to concrete or use gazebo anchors for pavers, precise marking ensures that everything lines up correctly during installation.Step 4: Secure with Anchors or WeightsDepending on your chosen method, either drill holes into the pavers for masonry anchors or apply adhesive at the base of each leg. You can also use sandbags or weight plates for a tool-free option. Each method helps to anchor a gazebo to pavers effectively based on your setup needs and environmental conditions.Step 5: Test for Stability and AdjustOnce you attach the gazebo to concrete or pavers, gently shake the frame to test its stability. Tighten all bolts, ensure the base is flush with the ground, and make any necessary adjustments. A properly anchored gazebo will remain secure in wind and daily use, providing long-term safety and support.How to Anchor a Gazebo Without Using a Drill Using Sandbags or Weight PlatesSandbags and weight plates are the easiest way to anchor a gazebo without using a drill. They add downward pressure to each leg, helping to stabilize the structure on windy days. This method works best for temporary setups or areas where you can’t alter the paver surface. While not as secure as permanent solutions, it’s a fast and accessible option to anchor a gazebo to pavers.Applying Construction Adhesive for Base PlatesIf your gazebo has base plates, you can apply a strong construction adhesive like polyurethane to bond them directly to

How to Remove Turf | Step-by-Step Guide
Landscaping

How To Remove Turf

How to remove turf effectively starts with understanding why you might need to take this step in the first place. Whether you’re planning to upgrade your yard with artificial turf, convert to drought-tolerant xeriscaping, or completely renovate your outdoor space, lawn removal becomes a crucial first task. Many homeowners and landscapers opt for removing grass to improve soil conditions, conserve water, or make room for more sustainable landscaping solutions. Choosing the right turf removal method and having the proper tools on hand can make the process smoother, faster, and more environmentally friendly setting the stage for a successful landscape transformation.Why Remove Turf Grass? Removing turf grass is a common step in many landscaping projects, especially for homeowners looking to improve outdoor spaces, conserve resources, or make way for upgrades. Here are the typical reasons why you might consider grass removal.Reduce Water UsageTurf grass requires constant watering to stay green, especially in hot climates like California. Many homeowners are removing turf grass to save on water bills and comply with local drought regulations. By removing turf by hand or using other eco-friendly methods, you can significantly lower your water usage and support a more sustainable landscape.Prepare For Artificial TurfBefore installing artificial turf, proper grass removal is necessary. Removing turf by hand ensures the area is clear of roots and debris, creating a smooth, stable surface for artificial turf. This step helps prevent uneven surfaces, weed growth, and drainage issues later on.Fix Poor Soil ConditionsSometimes, turf grass fails to thrive due to compacted or nutrient-poor soil. In these cases, removing turf by hand allows you to access and treat the underlying soil. After removal, the soil can be aerated, amended, and regraded for healthier plant growth or better drainage.Landscape RedesignWhen reimagining your outdoor space, grass removal is often the first step. Whether you’re planning a drought-tolerant garden, a new patio, or a fresh layout, removing turf opens up design possibilities. Removing turf by hand offers precise control, especially in areas near trees, flower beds, or walkways.Removing turf grass isn’t just about taking out the green it’s about creating a more efficient, beautiful, and functional landscape.Tools And Materials For Removing Turf Grass Successfully removing turf by hand or with equipment requires the right tools and materials. Here’s a list of essential items and what each one is used for in the grass removal process.Shovel or spadeUsed to cut and lift sections of turf. A sharp spade helps define edges and makes it easier to dig under the grass roots.Pickaxe or mattockHelpful for breaking up compacted soil or rocky areas beneath the turf. It loosens the ground and makes turf easier to remove.Sod cutter (manual or gas-powered)Ideal for larger areas, a sod cutter slices turf at the root level, allowing you to roll and remove it efficiently.RakeUsed to clear leftover roots, debris, and to smooth out the soil after turf has been removed.WheelbarrowMakes it easy to haul away removed turf, soil, and debris. It saves time and reduces strain during cleanup.Gloves and safety gearProtect your hands from blisters and cuts. Safety gear like boots and eye protection is also important for working with sharp tools and rough materials. Having the right tools on hand makes grass removal more efficient, safer, and less physically demanding.You may read How To Design A Landscape Plan?Methods For Removing Turf Grass There are several effective ways to handle lawn removal based on your landscape size, tools, and goals. Below are the most common methods for removing grass, including both manual and low-effort techniques.A. Dig and flip method (beginner-friendly)This is one of the easiest ways for homeowners to start removing grass without special tools.Step-by-step process: Use a shovel or spade to cut the turf into manageable sections Dig underneath the grass and lift each section Flip the turf over so the grass side is face-down Leave it to decompose naturally best for: small to medium-sized lawnsHow to compost or reuse flipped turf:Cover flipped turf with compost or mulch to speed up decomposition. Over time, it will break down into nutrient-rich soil you can reuse in garden beds.B. Manual removal with shovel or spadeThis traditional lawn removal method gives you more control, especially around edges or tight spaces.Step-by-step guide: Water the area lightly a day before to soften the soil Slice around the perimeter with a sharp spade Slide the spade underneath the turf to lift it in sections Roll or stack the removed turf for disposal or reuse Tips for slicing roots cleanly:Keep your spade sharp and angle it just beneath the roots for a clean cut. Work slowly to avoid tearing the turf or disturbing too much soil.C. Using a sod cutterFor larger landscapes, a sod cutter is the most efficient tool for removing grass quickly.when and how to use it:Use a manual or gas-powered sod cutter to slice under the turf at root level. Walk in straight lines and adjust the blade depth as needed.ideal for: large yards, commercial lawn removal, or preparing for artificial turf installationD. Sheet mulching (smothering method)This is an eco-friendly, no-dig method for removing turf without disturbing the soil structure.Eco-friendly, low-effort option:Lay down layers of cardboard or newspaper over the grass, then add mulch, compost, or soil on top.Time required and layering process:Sheet mulching takes 2–3 months to kill the grass completely. Start with a weed barrier (cardboard or newspaper), followed by 4–6 inches of organic mulch. Water the layers to help them settle and speed up decomposition.Each method offers unique benefits depending on your project. Whether you’re removing grass for a garden bed, artificial turf, or a full lawn removal, choose the approach that matches your timeline and area size.When To Require Professional Help While removing grass can be a DIY project, there are times when hiring experts makes more sense for efficiency, safety, and long-term results. Here are key signs it’s better to work with professionals.Turf covers a large or uneven areaIf your lawn is expansive or sits on a slope, manual lawn removal becomes labor-intensive and time-consuming. Professionals have equipment like

How Has Computerized Design Improved Landscaping Today
Landscaping

How Has Computerized Design Improved Landscaping​

How has computerized design improved landscaping? It has transformed the industry by addressing many of the challenges faced with traditional landscape planning such as inaccurate measurements, limited visualization, and time-consuming revisions. Before digital tools, landscape designs were sketched by hand, making it difficult for clients to visualize the final outcome and for designers to make fast, precise changes.Today, with 3D landscape design and virtual landscape design tools, professionals can create highly detailed, realistic models that allow clients to “walk through” their future outdoor spaces before a single plant is placed. These technologies enable faster revisions, better collaboration, and more accurate project execution. This article explores how computerized design enhances landscaping, the practical benefits it offers, and where this digital transformation is headed.How Has Computerized Design Improved Landscaping? Computerized design has revolutionized the landscaping industry by blending technology with creativity. Tools like CAD (Computer-Aided Design), 3D rendering, and GIS (Geographic Information Systems) now streamline the entire design process from initial concept to final execution.Faster planning & revisionsOne of the biggest benefits is speed. Computerized tools allow for quick drafting, easy adjustments, and real-time updates. This efficiency means landscape designers can test multiple ideas rapidly and fine-tune plans without starting from scratch perfect for smart landscape planning.Improved landscape visualizationGone are the days of flat blueprints. With 3D landscape design and rendering tools, clients can experience realistic walk-throughs of their future outdoor spaces. These immersive previews make it easier to understand scale, layout, and aesthetics leading to more confident decisions.Smarter, data-driven designCAD and GIS integrate data like topography, drainage, and sun patterns into the design process. This means more accurate site planning and sustainable outcomes. Designers can model how rainwater will flow or where sunlight hits throughout the day critical for plant placement and irrigation.Real-time collaborationComputerized design improves communication across the board. Clients, landscape designers, and contractors can view and comment on plans simultaneously, even remotely. Revisions can be made on the spot, reducing miscommunication and project delays. If you want best 3D Rendering Landscape Design in San Jose choose only Lakota Design Group.Advantages of Computerized Landscape Design Computerized tools have transformed the landscaping industry by improving precision, saving time, and supporting sustainable outdoor solutions. Below are the key advantages of computerized landscape design and how they enhance both residential and commercial projects.Precision in every detailOne of the biggest advantages of computerized landscape design is accuracy. CAD software allows designers to create precise layouts for plant placement, irrigation systems, and hardscape features like patios, retaining walls, and pathways. This level of precision ensures that every inch of the outdoor space is utilized efficiently, eliminating guesswork and costly mistakes.Time-saving and streamlined workflowComputerized design speeds up the entire project cycle from initial drafts to final approval. Changes can be made quickly without redrawing plans, which accelerates approvals and installation. This means faster project turnarounds and the ability to handle multiple projects simultaneously, making it ideal for both residential and commercial landscaping.Cost efficiency through accurate planningAccurate material takeoffs, labor estimates, and site analysis reduce the risk of overspending. With better visualization and clear documentation, there’s less room for error or rework during installation. These cost-saving benefits make computerized design a smart choice for budget-conscious clients and large-scale developments alike.Customization for unique spacesWhether it’s a small backyard or a sprawling commercial campus, computerized design tools allow for tailored landscape solutions. Designers can create multiple versions of a layout, adjust features in real time, and provide clients with interactive 3D walk-throughs. This ensures that the final design reflects the client’s vision and functional needs perfectly.Sustainability and eco-smart planningModern landscape design software supports sustainable practices. Designers can analyze sun exposure, drainage, and soil conditions to choose native plants, reduce water usage, and create climate-resilient layouts. These sustainable elements not only benefit the environment but also lower maintenance costs over time.You may read about How To Design A Landscape Plan?Computerized Landscape Design’s Future The future of landscaping is increasingly digital, intelligent, and immersive. As technology evolves, computerized landscape design is expanding beyond traditional CAD and 3D modeling, embracing innovations like AI, AR/VR, and automation to transform how outdoor spaces are planned, built, and maintained.AI-powered predictive designArtificial intelligence and machine learning are set to revolutionize smart landscape planning. These technologies can analyze past design data, site conditions, and environmental factors to suggest optimal layouts, plant selections, and material use. Predictive models can also forecast future growth patterns, ensuring long-term success and sustainability in every design.AR/VR for immersive experiencesVirtual landscape design is becoming more interactive through augmented reality (AR) and virtual reality (VR). Clients can walk through a digital version of their future landscape, exploring details like textures, lighting, and plant movement in real time. This next-level landscape visualization creates deeper engagement and faster design approvals.Smart landscape systems integrationThe future of computerized design includes fully integrated systems automated irrigation, outdoor lighting, and maintenance sensors all controlled via smart devices. Designers can plan these features directly into digital layouts, helping clients monitor water usage, lighting schedules, and plant health with ease. This is the core of future-ready smart landscape planning.Eco-conscious and data-driven planningAdvanced simulation models will enhance eco-conscious designs by modeling stormwater runoff, solar exposure, and soil health. These insights allow designers to create virtual landscape designs that are not only beautiful but also climate-resilient and sustainable, using native plants and low-impact materials intelligently.Automation in design and project managementAutomation tools will streamline project timelines by managing everything from material sourcing to crew scheduling. This reduces delays, lowers costs, and ensures quality control across the board. Designers can focus more on creativity while automated systems handle the technical and logistical tasks.Final Thoughts How has computerized design improved landscaping? It’s made the process faster, more accurate, and highly visual. With tools like CAD, 3D rendering, and GIS, designers can create smarter, more efficient plans enhancing everything from landscape visualization to smart landscape planning and virtual landscape design.At Lakota Design Group, we combine decades of experience with modern design technology to create custom, sustainable landscapes for homes and businesses alike.Let’s turn your vision into reality.Visit

How to Design a Landscape Plan | 5 Easy Steps
Landscaping

How To Design A Landscape Plan​

How to design a landscape plan starts with understanding the blueprint that guides every successful outdoor project. A landscape plan is a detailed layout that shows the placement of plants, pathways, lighting, and other elements to bring a cohesive vision to life. Planning landscape design in advance helps avoid costly mistakes, ensures proper spacing, and aligns your yard with functional needs and aesthetic goals. Whether you’re starting with a simple landscape plan or a full-scale design, thoughtful planning saves time and maximizes results. In this guide, you’ll learn the five core principles of landscape design, explore different types of plans, and discover when it’s best to consult a professional.How to Design a Landscape Plan in Five Easy Steps Designing a landscape doesn’t have to be overwhelming. Whether you’re enhancing curb appeal or creating a relaxing outdoor space, following a structured approach helps ensure success. Here’s how to create simple landscape plans in five easy steps.Step 1: Analyze Your SiteStart by assessing your yard’s natural features. Observe sun and shade patterns throughout the day, take note of any slopes or drainage issues, and test your soil type. This information is essential for choosing plants and hardscape features that will thrive in your environment. A thorough site analysis forms the foundation of any effective landscaping plan.Step 2: Determine Your Needs and WantsThink about how you’ll use the space. Do you need a play area for kids, a quiet spot for reading, or a garden for growing herbs? Identify functional zones that serve your lifestyle. This step helps prioritize features that matter most, whether it’s a fire pit, pergola, or vegetable beds. Knowing your needs early leads to more practical and tailored landscape design plans.Step 3: Create a Rough Sketch or Base MapDraw a basic layout of your yard to scale, marking existing structures, trees, and property lines. You can do this by hand or use digital landscape design tools. This simple landscape plan serves as your visual guide, helping you position elements logically and ensure balance in your layout.Step 4: Choose Plants and MaterialsSelect plants suited to your local climate, soil, and sunlight conditions. Native and drought-tolerant varieties are excellent for low-maintenance, water-efficient landscaping. Also, decide on materials for walkways, patios, and edging. Matching your choices with your site analysis keeps your landscaping plan both beautiful and sustainable.Step 5: Finalize and Refine the PlanReview your layout to align with your budget, timeline, and irrigation needs. Make any necessary adjustments, like resizing garden beds or changing materials for cost efficiency. This final step ties all parts of your landscape design plans together, ensuring everything works cohesively before installation begins.You may read about How Much Does Landscape Design Cost?5 Basic Principles of Landscape Design Creating a cohesive and visually appealing outdoor space begins with understanding the core principles behind every effective landscaping plan. These five basic principles help you develop simple landscape plans that are both functional and beautiful.1. UnityUnity means maintaining a consistent style across your yard. Whether you prefer a modern, minimalist look or a lush, cottage-style garden, every element should feel like it belongs. Repeating colors, materials, or plant types throughout your landscape design plans helps create a sense of wholeness and continuity.2. BalanceBalance brings stability to your design. A symmetrical design places matching elements on either side of a central point ideal for formal spaces. In contrast, an asymmetrical approach uses different elements that carry equal visual weight for a more natural, informal look. Both options serve different landscaping plan goals depending on your personal aesthetic.3. Contrast and HarmonyUsing contrast and harmony helps guide the eye and enhance interest. Combine bold textures with soft foliage or bright flowers with neutral hardscapes to create visual impact. At the same time, ensure all elements work together so the space feels cohesive. These techniques can elevate even the most simple landscape plan.4. ProportionProportion is about scale the size relationship between plants, structures, and open space. Large trees next to tiny shrubs can look awkward, while properly scaled features maintain balance and usability. Keeping proportion in mind ensures that every part of your landscape design plans fits naturally within the overall space.5. Rhythm and RepetitionRepeating patterns, shapes, or colors leads the eye smoothly through the landscape. Whether it’s a row of planters or repeated lighting elements, rhythm gives your space a sense of movement and order. This design principle helps connect different zones within your landscaping plan and makes the layout feel intentional. If you want professional Landscape design service in San Jose then contact no other than Lakota Design Group.Types of Landscapes: Choosing the Right Style for Your Property When planning landscape design, selecting the right landscape style sets the tone for your entire outdoor space. From structured gardens to natural retreats, understanding the types of landscapes helps you create a landscaping plan that suits your lifestyle, climate, and property layout.Formal vs. Informal LandscapesFormal landscapes feature symmetry, straight lines, and well-organized plant arrangements. They often include neatly trimmed hedges, geometric pathways, and coordinated color schemes. In contrast, informal landscapes use curved lines, varied plant groupings, and a more relaxed, natural feel. Your choice depends on whether you prefer order and structure or a more casual, organic aesthetic when planning landscape design.Xeriscape and Drought-Tolerant DesignsXeriscaping focuses on water-efficient landscaping, using native and drought-tolerant plants, minimal turf, and efficient irrigation systems. This type of landscape is ideal for dry climates and helps reduce water use while still maintaining beauty. If you’re in a region with limited rainfall, xeriscape options should be central to your landscaping plan.Modern, Tropical, Desert, Woodland, and MoreModern landscapes emphasize clean lines, minimalism, and architectural elements like concrete, gravel, and sculptural plants. Tropical landscapes use bold foliage, vibrant flowers, and water features for a lush, exotic look. Desert designs incorporate cacti, succulents, and rocks, while woodland landscapes blend native trees, ferns, and shade-loving plants for a natural forest feel. Each style offers different visual appeal and maintenance needs, so choose based on your environment and personal taste.How to Choose the Right

Landscaping

How Much Does Turf Lawn Cost​?

How much does turf lawn cost? It’s a common question for homeowners looking to switch to a low-maintenance, water-saving solution. Artificial turf lawns also called synthetic lawns offer a clean, green look year-round without the hassle of mowing, watering, or fertilizing. But before making the switch, it’s important to understand the full picture of turf lawn cost. From materials and installation to long-term savings, knowing your synthetic lawn cost upfront helps you plan effectively and avoid unexpected expenses. Whether you’re covering a small yard or a larger landscape, calculating the real turf lawn cost is the first step to making a smart investment in your outdoor space.Average Cost of Artificial Lawn in the U.S. When considering a switch to artificial turf, understanding the synthetic grass cost is essential for budgeting and planning. In the U.S., the national average cost of artificial lawn installation typically ranges between $8 to $15 per square foot, depending on materials, labor, and project scope.Synthetic Lawn Prices by Project Size Project Size Estimated Cost Range Small Yard (300 sq ft) $2,400 – $4,500 Medium Yard (600 sq ft) $4,800 – $9,000 Full Backyard (1,000 sq ft) $8,000 – $15,000 Large Yard (2,000+ sq ft) $16,000+ What Affects Synthetic Grass Cost? Turf Quality: Higher-grade turf with realistic textures costs more but offers better durability and appearance. Site Preparation: Removing natural grass, leveling soil, and adding a base layer adds to the total synthetic lawn prices. Labor: Labor rates vary by region. In California, for example, expect the higher end of the cost range. Extras: Edging, drainage solutions, infill materials, or custom designs will also impact synthetic grass cost. How Much Does Turf Lawn Cost Per Square Foot? When planning your landscape upgrade, understanding turf lawn cost per square foot helps you budget accurately. On average, the synthetic lawn cost in the U.S. varies depending on the turf type, region, and whether you’re purchasing materials only or opting for professional installation.Turf Lawn Cost Per Square Foot Type Cost (Material Only) Cost (Installed) Standard Landscape Turf $2.00 – $4.00 $8.00 – $12.00 Pet-Friendly Turf $3.00 – $5.50 $10.00 – $15.00 Premium Natural-Look Turf $4.00 – $6.00 $12.00 – $16.00 Regional Pricing DifferencesIn areas like the Bay Area, turf lawn cost tends to be on the higher end of the scale due to labor rates, permitting requirements, and soil conditions. For instance: National average synthetic lawn cost (installed): $8 – $12 per sq ft Bay Area turf lawn cost (installed): $10 – $16 per sq ft Factors That Affect Synthetic Lawn Cost Turf Type: Landscape turf is designed for aesthetics, while pet-friendly turf includes extra drainage and odor control, impacting the synthetic lawn cost. Sub-base Preparation: Costs increase if excavation, leveling, or additional drainage is needed. Project Complexity: Curved edges, slopes, or integration with pavers can add labor time and raise the turf lawn cost. Volume Discounts: Larger installations may qualify for reduced per-square-foot rates. You may read about Can You Lay Turf Over Existing Grass?What Affects Artificial Turf Lawn Costs? If you’re considering artificial turf, it’s important to understand the factors that impact the synthetic lawn cost. From material selection to installation details, each element can shift your overall turf lawn cost up or down. Here’s a breakdown of what influences pricing the most:Material QualityNot all artificial turf is created equal. The quality of materials plays a major role in overall synthetic lawn cost: Blade Type: Turf blades come in various shapes and densities. More realistic, soft-touch blades cost more than basic varieties. Infill Material: Options include silica sand, rubber, or pet-safe alternatives. Each affects price and performance. Backing System: Dual-layered, perforated backings improve durability and drainage, but increase cost. Higher-end turf may cost $4–$6 per sq ft (materials only), while budget turf starts around $2 per sq ft.Installation ComplexityInstallation is more than just laying turf. The more complex the job, the higher the turf lawn cost: Grading & Leveling: Sloped or uneven surfaces require excavation and grading. Drainage Solutions: Adding a proper base and drainage system is essential, especially in areas prone to water pooling. Borders & Edging: Custom borders (e.g., pavers, bender board) add both function and aesthetic value but also extra labor and materials. If you want artificial turf installation in San Jose or near by areas contact non other than Lakota Design Group. Site ConditionsYour yard’s current condition can have a significant impact on synthetic lawn cost: Accessibility: Tight spaces or hard-to-reach backyards require more labor and time. Existing Lawn Removal: Removing sod, rocks, or concrete adds prep time and disposal fees. Soil Type: Sandy or clay-heavy soils may require added stabilization layers. On average, site prep can add $1.50–$3.00 per sq ft to the total turf lawn cost.Labor Costs: DIY vs. Professional Installation DIY Installation: While you can save on labor, DIY jobs often miss key steps like proper base compaction or seaming, which can lead to long-term issues. Professional Installation: Adds peace of mind, proper drainage setup, and long-term durability but labor costs can range from $4–$8 per sq ft depending on the region. In high-cost regions like the Bay Area, labor rates may push the total synthetic lawn cost to the higher end especially on complex installations.Cost Comparison | Artificial Turf vs Natural Grass Choosing between artificial turf and natural grass isn’t just about looks it’s a financial decision. While the synthetic lawn cost is higher upfront, it offers long-term savings that can outweigh the initial investment. Here’s a breakdown of costs, savings, and return on investment (ROI) over time.Upfront Cost vs. Long-Term Maintenance Lawn Type Installation Cost (per sq ft) Annual Maintenance Cost Lifespan Artificial Turf $8 – $15 (installed) $100 – $300 15–20+ years Natural Grass $1 – $2 (sod) $1,000 – $2,500+ Ongoing Artificial turf has a higher turf lawn cost upfront but requires little to no maintenance. Natural grass may be cheap to install but demands constant care—mowing, fertilizing, weeding, irrigation, and seasonal repairs.Water Usage & Utility Bill ReductionOne of the biggest advantages of artificial turf is

How Much Is Turf Per Square Foot – Full Cost Guide
Landscaping

How Much Is Turf Per Square Foot​

How much is turf per square foot depends on several factors, including turf quality, installation complexity, and site preparation needs. As artificial turf gains popularity in both residential and commercial landscapes, many property owners are considering it for its low maintenance and year-round greenery. Understanding the artificial turf cost per sq ft is essential before beginning your installation project. Prices typically range from $5 to $20 per square foot, depending on the materials and labor involved. Whether you’re enhancing a backyard or upgrading a commercial space, knowing the cost of turf per square foot helps you budget accurately. In terms of longevity and curb attractiveness, it’s a long-term investment.Artificial Turf Cost Breakdown Understanding the turf cost per square foot is key to budgeting your landscaping project accurately. Artificial turf prices can vary widely depending on material quality, labor, and installation complexity. Below is a breakdown of what you can expect in terms of pricing.The average cost of turf per square foot, including materials and installationThe average cost of artificial grass, including supplies and expert installation, is between $6 and $15 per square foot. This range factors in different grades of turf, project size, and site conditions.Low-End Turf ($6 – $8 per sq. ft.) Materials: Basic synthetic grass, often with shorter pile height and minimal infill. Installation: Limited site prep, suitable for small or low-traffic areas. Ideal for: Temporary setups, pet areas, or tight budgets. Mid-Range Turf ($8 – $12 per sq. ft.) Materials: Higher-quality turf with realistic textures and UV protection. Installation: Standard base preparation, proper drainage layers, and infill. Ideal for: Residential lawns, play areas, or light commercial use. Premium Turf ($12 – $15+ per sq. ft.) Materials: Top-tier artificial grass with natural appearance, cooling technology, and superior durability. Installation: Professional-grade base prep, grading, weed barrier, and expert labor. Ideal for: Luxury landscapes, commercial properties, or high-traffic zones. What’s Included in the Cost? Turf Material: The cost of artificial grass per square foot is greatly influenced by the kind of artificial grass you select. Base Preparation: Excavation, compacted aggregate base, and weed barrier installation. Labor: Skilled installation ensures proper drainage, seam placement, and longevity. Infill & Accessories: Silica sand, antimicrobial infill, nails, seam tape, and more. Bottom line: Whether you’re enhancing your backyard or upgrading a commercial space, understanding the turf cost per square foot helps you make informed decisions and choose the right solution for your needs.Cost by Artificial Grass Type Depending on the kind of turf you select, the price of artificial turf per square foot might vary greatly. Each type is designed for a specific use, with differences in durability, texture, infill requirements, and overall performance. Below is a breakdown of the most common types of artificial grass and how they impact the turf cost per square foot.Landscape Turf Cost: $8 – $12 per sq. ft. (materials + installation) Durability: Moderate to high; built to handle light foot traffic and outdoor elements Texture: Soft, realistic blades designed to mimic natural grass Infill Type: Silica sand or antimicrobial infill Best For: Front yards, backyards, and decorative spaces Landscape turf is the most common choice for residential applications. It strikes a balance between affordability and appearance. The artificial turf cost per sq ft is mid-range and depends on pile height, blade shape, and brand quality.Pet-Friendly Turf Cost: $9 – $13 per sq. ft. Durability: High; engineered to withstand pet activity and frequent cleaning Texture: Soft but dense to resist digging and wear Infill Type: Antimicrobial infill with odor-control features Best For: Pet runs, dog yards, kennels Pet turf is designed for drainage and cleanliness. It often includes a deodorizing infill and a durable backing. Because of these specialized features, the turf cost per square foot tends to be slightly higher than standard landscaping turf.Sports Turf Cost: $10 – $14 per sq. ft. Durability: Very high; built to endure intense athletic use Texture: Firm and resilient, designed for impact absorption and traction Infill Type: Rubber pellets or specialized sports infill Best For: Soccer fields, training grounds, and multi-use courts Sports turf is engineered for safety, performance, and durability. It requires a high-grade infill and specific installation techniques, which increase the artificial turf cost per sq ft compared to landscape options.Putting Green Turf Cost: $12 – $20 per sq. ft. Durability: High; smooth and compact to maintain consistent ball roll Texture: Short, tightly woven blades for precision play Infill Type: Minimal or silica sand only Best For: Backyard putting greens, golf facilities Putting green turf is the most specialized type, with precise installation and base grading required. This contributes to a higher turf cost per square foot, especially when custom contours and fringe grass are added. You may read about How Much To Water New Turf?Other Factors That Impact Artificial Turf Cost Beyond the turf type, several site-specific and product-related factors influence the cost of turf per square foot. These elements can significantly affect your total project price and should be considered when planning your artificial grass installation.Site Conditions: Grading, Drainage & Access Impact: Moderate to High If your property requires grading to level the surface or additional drainage solutions, expect increased labor costs. Difficult access such as narrow gates or steep slopes can also raise the installation price due to the added effort and equipment needed. These factors directly affect the cost of turf per square foot, especially for larger or complex installations. Size and Shape of the Area Impact: Moderate Larger, open areas typically result in a lower cost of turf per square foot due to economies of scale. Irregular shapes, curves, or tight corners may require more precise cutting and seam work, which increases labor time and material waste. Turf Pile Height and Face Weight Impact: High The length of the fake grass blades is referred to as pile height. Taller piles are more expensive but feel softer. Face weight measures the turf’s density; higher face weight equals more material and greater durability. Premium turf with taller blades and heavier face weight will raise the cost of

Our Client's Reviews

Copyright © 2025 | Localpro1 | All Rights Reserved.

English