Author name: admin

Small Front Yard Landscaping Ideas
Uncategorized

10 Small Front Yard Landscaping Ideas That Make a Big Impact

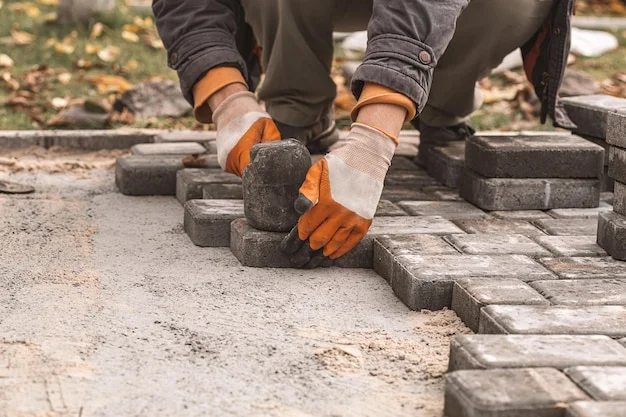
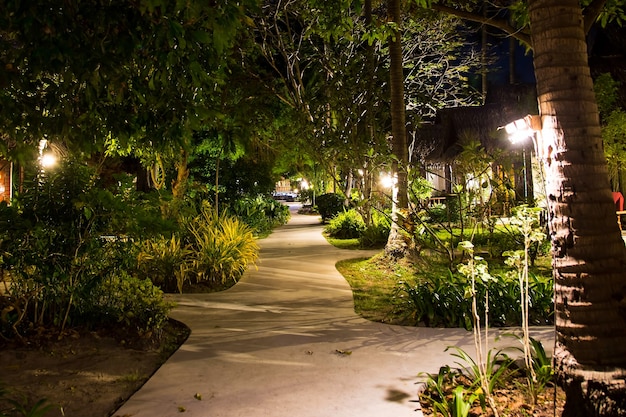
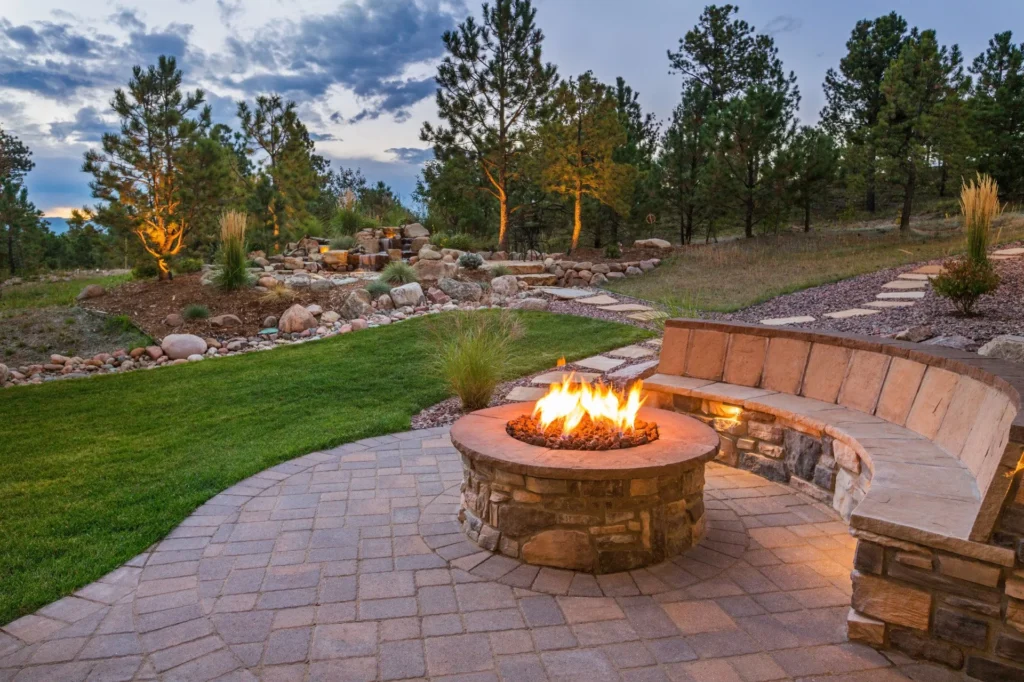
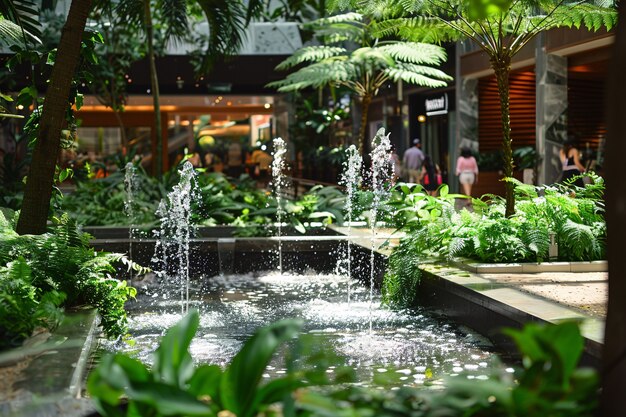
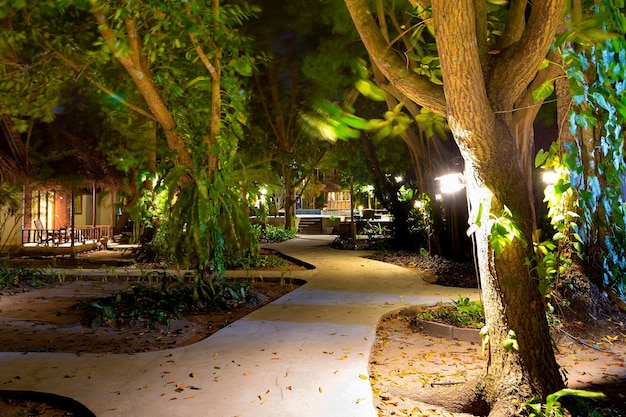
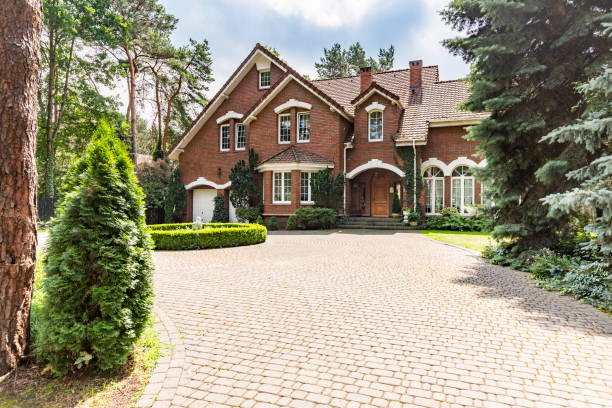
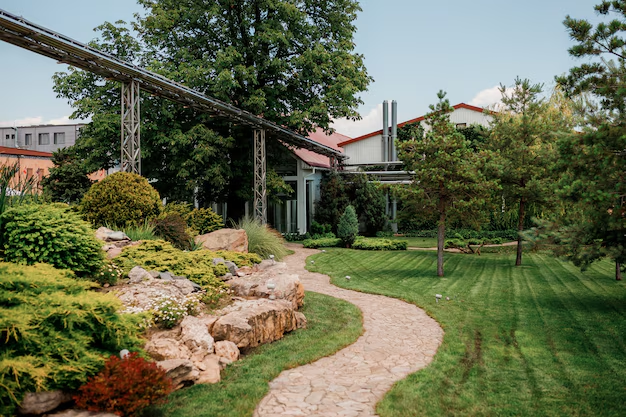
Don’t overlook your tiny yard! Even the smallest outdoor spaces can be transformed into beautiful, functional extensions of your home. At Lakota Design Group, we specialize in creating thoughtful, space-saving landscape designs that enhance curb appeal and suit your lifestyle.Before diving into your small front yard landscaping ideas, consider what you want most from the space. Do you dream of a cozy retreat for morning coffee, a haven for local wildlife, or a lush, private oasis? Thoughtful landscape design ensures every element—whether a shade tree, garden path, or flower bed—works to enhance your vision. 1. Use Vertical LandscapingWhen space is limited, go vertical! Vertical landscaping allows you to maximize greenery without taking up valuable ground space. Consider installing trellises with climbing plants like jasmine or ivy, hanging flower baskets, or even a living wall with succulents or ferns. Raised garden beds and privacy trellises can also serve multiple functions—offering greenery while dividing spaces or creating shaded areas.Additionally, vertical elements like layered planters, stacked stone walls, or wall-mounted herb gardens add depth and texture to your yard. Not only does this approach enhance curb appeal, but it also makes the space feel larger and more dynamic. Opt for native, low-maintenance plants to keep upkeep minimal while still enjoying a lush, vibrant front yard!2. Incorporate a Winding PathwayInstead of a straight walkway, a curved or winding pathway can create the illusion of depth and space, making your small front yard feel more expansive. Use stepping stones, brick, or gravel to craft an inviting path that naturally guides visitors to your front door with charm.To enhance the aesthetics, line the path with low-growing plants, ornamental grasses, or colorful flowers that soften the edges and add visual interest. For a more structured look, consider raised flower beds or border edging with natural stone or decorative pavers. Adding subtle landscape lighting along the pathway will not only highlight the design but also improve safety and ambiance in the evening.3. Opt for Multi-Level PlantingLayering your plants with different heights creates a sense of depth and dimension, making your small front yard feel more expansive. Start with taller shrubs or ornamental trees at the back to provide structure, followed by medium-sized flowers or perennials in the middle, and finish with low-growing ground covers or decorative grasses at the front.For a dynamic and lush look, mix textures and colors—use evergreens for year-round interest, flowering plants for seasonal pops of color, and creeping ground covers to soften edges. This layered approach not only adds visual appeal but also helps with natural shading, privacy, and erosion control, making your small front yard feel thoughtfully designed and vibrant.4. Use Potted Plants and Containers Potted plants are perfect for small spaces as they allow flexibility in design. You can use a variety of pots with different heights, colors, and textures to add character to your front yard. Plus, they can be easily rearranged to refresh the look with the seasons.5. Create a Focal PointA striking focal point can instantly elevate your front yard’s appeal and create the illusion of more space. Consider a small fountain for a touch of tranquility, a beautifully shaped ornamental tree like Japanese maple for year-round interest, or a birdbath to attract local wildlife.For a modern touch, an eye-catching sculpture or decorative boulder can serve as a statement piece. Position your focal point strategically—at the center of a curved pathway, near the entryway, or framed by layered plants—to draw attention and add a sense of balance. This thoughtful placement not only enhances visual appeal but also creates a welcoming, intentional landscape design. 6. Add Edging for DefinitionDefining different sections of your yard with edging creates a clean, organized, and polished look. Use materials like brick, natural stone, metal, or decorative pavers to separate flower beds from the lawn, driveways, or walkways. This not only enhances curb appeal but also helps maintain tidy garden spaces by preventing grass from creeping into planting areas.For a seamless, modern feel, opt for metal or concrete edging, while natural stone or wood can bring a rustic charm. Curved edging can add flow and movement, making your small front yard feel more spacious and intentional. With well-defined spaces, your landscape remains clutter-free, visually appealing, and easy to maintain.7. Use Drought-Tolerant Plants For an easy-to-maintain and eco-friendly Bay area landscape design, opt for drought-tolerant plants such as succulents, ornamental grasses, and native perennials. These plants require minimal watering and upkeep while still providing vibrant colors and textures to your landscaping ideas for a small yard.8. Install Outdoor LightingOutdoor lighting transforms your small front yard into a charming and functional space even after sunset. Strategically placed lights not only enhance beauty and ambiance but also improve security and safety.Use path lights to guide visitors along walkways, uplighting to highlight trees or architectural features, and soft-glow lanterns for a warm, inviting feel. String lights draped over small trees or along a fence can add a whimsical touch, while solar-powered or LED fixtures provide an eco-friendly, low-maintenance solution. Thoughtful lighting placement ensures your landscape remains visually appealing and accessible, creating a cozy front yard that shines day and night.You can also read about Top 10 Residential Tropical Landscape Design Ideas. 9. Incorporate a Small Seating AreaA cozy bench or small bistro set instantly makes your front yard more inviting, transforming it into a relaxing outdoor retreat. If space allows, consider adding a small patio, deck, or seating nook where you can enjoy your morning coffee or unwind in the evening.To enhance privacy and ambiance, surround the seating area with lush greenery, potted plants, or decorative shrubs. Climbing vines on a trellis or pergola can create a sense of enclosure, while soft outdoor lighting adds warmth and charm. Even in a compact space, a thoughtfully designed seating area can make your small front yard feel like a peaceful escape.10. Keep It Minimal and UnclutteredLess is more when it comes to small front yard landscaping ideas. Overcrowding with too many plants, decorations, or features can make the space feel

Are Solar Outdoor Lights Worth It
Uncategorized

Are Solar Outdoor Lights Worth It?

In recent years, solar-powered outdoor lighting has gained immense popularity as an energy-efficient and eco-friendly alternative to traditional wired lights. Whether you’re looking to illuminate your garden, patio, or pathways, solar outdoor lights offer an excellent solution that requires minimal maintenance and zero electricity costs. But are they truly worth the investment? In this article, we will explore the advantages and potential drawbacks of solar outdoor lighting, with a special focus on outdoor wall lantern solar lights, outdoor solar lantern lights, and hanging solar lanterns outdoor.Benefits of Solar Outdoor Lights 1. Energy Efficiency & Cost Savings One of the biggest reasons homeowners opt for solar outdoor lights is their energy efficiency. Since they harness the sun’s power to operate, they eliminate the need for traditional electricity, resulting in lower utility bills. Once installed, these lights function without adding to your monthly expenses, making them a cost-effective choice in the long run. 2. Environmentally Friendly Switching to solar-powered landscape lighting bay area is an eco-conscious decision. Unlike traditional electric lights, solar lights rely on renewable energy and do not contribute to carbon emissions. This sustainable alternative helps reduce your overall carbon footprint, making it a great choice for environmentally conscious homeowners.3. Easy Installation & Low Maintenance Unlike wired outdoor lights, which require professional installation and extensive wiring, solar lights are incredibly easy to install. Most models come with a simple stake or mounting bracket, allowing you to place them anywhere with adequate sunlight. Additionally, these lights require little to no maintenance—just occasional cleaning of the solar panels to ensure optimal performance.4. Versatility in Design & Functionality Solar outdoor lights are available in a wide variety of designs, making them a versatile addition to any outdoor space. Whether you need accent lighting, security lighting, or decorative lanterns, there’s a solar option for every need. Some of the most popular choices include: Outdoor Wall Lantern Solar Lights: These are perfect for illuminating entryways, driveways, and patios. They add a charming aesthetic while providing ample brightness for safety and security. Outdoor Solar Lantern Lights: These portable and stylish lanterns can be placed on tables, pathways, or garden beds, enhancing the ambiance of your outdoor area. Hanging Solar Lanterns Outdoor: Ideal for creating a cozy and inviting atmosphere, hanging solar lanterns can be suspended from pergolas, tree branches, or porch ceilings. Potential Drawbacks of Solar Outdoor Lights While solar outdoor lights offer numerous advantages, they do have some limitations that you should consider before making a purchase.1. Dependence on SunlightSince these lights rely entirely on solar energy, their performance is directly affected by the amount of sunlight they receive. Cloudy or rainy days can result in dimmer lights or shorter operating times. If you live in an area with frequent overcast conditions, you may need to invest in high-quality solar lights with better battery storage.2. Initial CostAlthough solar outdoor lights eventually pay for themselves in energy savings, the initial investment can be higher compared to traditional outdoor lighting. Premium models with advanced features, such as motion sensors or adjustable brightness settings, tend to be more expensive. However, considering the long-term benefits, the investment is often worthwhile.3. Limited Brightness & Battery LifeWhile modern solar lights have significantly improved in brightness and efficiency, they may not be as powerful as traditional electric lights. The duration of illumination also depends on battery capacity, which can vary among different models. If you need high-intensity lighting for security purposes, you may need to opt for solar lights with stronger LED bulbs and larger battery capacity. How to Choose the Best Solar Outdoor Lights When selecting the right solar outdoor lights for your space, consider the following factors: Brightness & Lumens: Look for models with a suitable lumen output based on your lighting needs. For instance, decorative lanterns can have lower lumens, while security lights should be brighter. Battery Capacity & Charging Time: Ensure that the battery can store enough energy to last through the night. Some models offer longer run times with efficient charging mechanisms. Weather Resistance: Opt for lights with a high waterproof rating (IP65 or higher) to withstand rain, snow, and other outdoor elements. Aesthetic Appeal: Choose designs that complement your outdoor decor, whether it’s a classic outdoor wall lantern solar light, elegant outdoor solar lantern lights, or charming hanging solar lanterns outdoor. Conclusion: Are Solar Outdoor Lights Worth It? Absolutely! Solar outdoor lights are an excellent investment for homeowners looking for an eco-friendly, cost-effective, and hassle-free lighting solution. While they do have some limitations, such as dependence on sunlight and limited brightness, their benefits far outweigh the drawbacks. Whether you’re considering outdoor wall lantern solar lights, outdoor solar lantern lights, or hanging solar lanterns outdoor, these lighting options can enhance your outdoor space while saving you money and reducing your environmental impact.By choosing high-quality solar lights and placing them strategically, you can enjoy beautiful and functional outdoor illumination without the ongoing costs of traditional electric lighting. So, if you’re thinking about upgrading your outdoor lighting, solar-powered options are definitely worth considering! Choose Lakota Design Group and contact us today to explore the best solar lighting solutions for your outdoor space.FAQs Do solar outdoor lights work in winter?Yes, solar outdoor lights work in winter, but their efficiency may decrease due to shorter daylight hours and potential snow coverage on the solar panels. How long do solar outdoor lights last?Most solar lights last between 2 to 5 years, depending on the battery quality and maintenance. Do solar lights need direct sunlight to charge?While direct sunlight provides the best charge, solar lights can still charge in indirect sunlight or on cloudy days, though at a slower rate. Are solar outdoor lights waterproof?Most solar outdoor lights are designed to be weather-resistant, with an IP65 or higher rating for protection against rain and moisture. How do I maintain my solar outdoor lights?Regularly clean the solar panels to remove dirt and debris, and check the battery for any signs of wear to ensure optimal performance.

Paver Installation Professional
Uncategorized

Five Reasons to Hire a Paver Installation Professional

Are you planning to enhance your outdoor space with beautiful, durable pavers? Whether it’s a patio, driveway, or walkway, installing pavers is a significant investment. While DIY may seem like a tempting option, hiring a Paver Installation Professional ensures high-quality results, saves time, and increases the longevity of your outdoor surfaces.In this article, we’ll explore five compelling reasons why working with a Professional Paver Installer is the best decision for your project. 1. Expertise and Experience Matter When it comes to Bay area paver installation, expertise makes all the difference. Professional Paver Installers have years of hands-on experience in handling various types of pavers, including brick, concrete, and natural stone. Their knowledge ensures: Proper site preparation and grading to prevent water pooling. Selection of high-quality materials suited to your specific environment. Expert cutting and fitting techniques for a flawless finish. Compliance with local codes and regulations. With a Paver Installation Professional, you avoid common DIY mistakes such as uneven surfaces, shifting pavers, and poor drainage, all of which can lead to costly repairs in the future.Additionally, professionals bring artistic design skills, helping you achieve a unique and visually appealing outdoor space tailored to your aesthetic preferences. They understand different patterns and layouts, ensuring that your paver installation complements your home’s style and architecture.2. Access to the Right Tools and Equipment Installing pavers isn’t just about laying stones on the ground; it requires specialized tools and equipment. A PROFESSIONAL PAVER INSTALLER comes prepared with: Plate compactors to ensure a solid base. Wet saws and cutting tools for precise paver shapes. Leveling instruments to maintain even surfaces. Polymeric sand and sealers to lock pavers in place and enhance durability. These tools not only improve the quality of installation but also reduce project time, ensuring your outdoor space is ready for use much sooner. Without access to professional-grade tools, DIY installations often result in misaligned pavers, weak foundations, and gaps that allow weeds to grow over time.3. Time and Cost Efficiency Many homeowners believe that taking the DIY route will save money. However, without professional experience, you may end up spending more due to: Wasted materials from incorrect cuts or measurements. Extended project timelines due to lack of expertise. Unexpected repairs from improper installation techniques. Hiring a Paver Installation Professional means your project gets completed efficiently, within budget, and without unnecessary delays. They also have industry connections, allowing them to source high-quality materials at lower costs than retail buyers.Moreover, a professional can work within a pre-determined budget, ensuring that there are no surprise expenses. They provide accurate estimates before starting the project, so you know what to expect financially. 4. Long-Lasting and High-Quality Results A properly installed paver surface is built to last for decades. Professional Paver Installers use superior techniques to: Create a sturdy, compacted base that prevents shifting. Apply proper edge restraints to keep pavers in place. Ensure proper drainage to prevent water damage and erosion. Use high-quality jointing sand to prevent weeds and pests. These factors contribute to a visually stunning and highly durable surface that enhances the value of your property. Investing in professional paver installation can increase your home’s curb appeal and resale value, making it a smart long-term decision.Additionally, professionals use advanced sealing techniques to protect pavers from stains, weather damage, and fading. This ensures that your paver surfaces remain vibrant and beautiful for years with minimal maintenance.5. Warranty and Peace of Mind One of the biggest advantages of hiring a Paver Installation Professional is the peace of mind that comes with warranties and guarantees. Many professional companies offer: Material warranties from manufacturers. Workmanship guarantees covering installation defects. Maintenance advice to extend the life of your pavers. With these warranties, you’re assured that if any issues arise, they will be addressed promptly without additional costs on your end. DIY installations, on the other hand, provide no such assurances, leaving you responsible for any mistakes or repairs.Furthermore, professionals offer ongoing maintenance services, including paver cleaning, resealing, and minor repairs, ensuring that your investment remains in top condition for years to come.Conclusion: Transform Your Outdoor Space with Lakota Design Group When you invest in paver installation, you want the best results that last for years to come. Hiring a professional paver installer ensures superior craftsmanship, cost savings, and a stunning final product.Contact us At Lakota Design Group, we specialize in premium paver installation services tailored to your unique vision. Our team of experts is committed to delivering exceptional quality and long-lasting results. Whether you need a patio, driveway, or walkway, we have the skills, tools, and expertise to bring your outdoor space to life.With our professional approach, attention to detail, and commitment to customer satisfaction, you can trust us to handle your paver installation with precision and care. Don’t settle for anything less than perfection,choose Lakota Design Group for your next outdoor project.FAQs Why should I hire a Paver Installation Professional instead of doing it myself?Hiring a professional ensures expert craftsmanship, proper drainage, and long-lasting durability while avoiding common DIY mistakes like uneven surfaces and shifting pavers. What tools do Professional Paver Installers use?Professionals use specialized tools such as plate compactors, wet saws, leveling instruments, and polymeric sand to ensure precision, stability, and a flawless finish. Does hiring a professional save money in the long run?Yes! Professionals prevent costly mistakes, source high-quality materials at lower prices, and ensure a long-lasting installation that minimizes future repairs. How does professional installation improve the lifespan of my pavers?Experts use proper base preparation, edge restraints, and sealing techniques to prevent shifting, water damage, and weed growth, keeping your pavers in top condition for decades. Do professionals offer warranties on paver installations?Yes, many professionals provide warranties on materials and workmanship, giving you peace of mind and protection against potential installation defects.

15 FAQs and Answers About Outdoor Turf for Dogs
Uncategorized

15 FAQs and Answers About Outdoor Turf for Dogs

Are you considering outdoor turf for dogs but have questions before making a decision? You’re not alone! Pet owners everywhere are turning to artificial grass for dogs outside as a low-maintenance, pet-friendly alternative to natural lawns. This option provides a lush, green space for your furry friend to run and play year-round, without the hassle of mud, pests, or dead patches. Unlike natural grass, turf grass for dogs is designed to withstand heavy use, ensuring a durable and clean outdoor environment. Plus, artificial grass eliminates the need for pesticides, fertilizers, and excessive watering, making it an eco-friendly choice for pet owners. Whether you have a small backyard or a large outdoor space, outdoor turf for dogs offers a practical and aesthetically pleasing solution that both you and your pet will love.In this comprehensive guide, we’ll answer 15 FAQs and Answers About Outdoor Turf for Dogs, helping you decide if it’s the right fit for your furry friend.1. Is Artificial Turf Good for Dogs?Absolutely! Artificial grass for dogs outside is designed with pets in mind. It provides a soft, durable surface that is safe for your pup to run, play, and relax on. Plus, it eliminates muddy paws and reduces allergens. Unlike natural grass, it doesn’t develop bare patches or mud puddles, making it a great year-round solution. Additionally, artificial turf in the bay area reduces the risk of flea infestations since pests are less likely to thrive on synthetic surfaces.2. Will My Dog Enjoy Playing on Turf Grass?Yes! Many dogs love the feel of turf grass for dogs. The soft yet sturdy texture mimics natural grass while providing a consistent and comfortable play area. It remains resilient even with heavy use, allowing your pet to play and exercise without wearing down the surface. Some dogs even find it more comfortable than natural grass, especially since it remains uniform and doesn’t develop uneven spots.3. Does Outdoor Turf for Dogs Get Too Hot?On hot summer days, outdoor turf for dogs can get warm, but cooling solutions such as shade, water sprinklers, or specialized cooling infill can help maintain a comfortable surface temperature. Some advanced artificial turfs in the bay area are designed with heat-resistant technology that helps reduce heat absorption. Placing a shaded area over part of the turf can also provide a cool retreat for your dog during peak sun hours.4. Is Artificial Grass Safe for Dogs?Yes! High-quality artificial grass for dogs outside is non-toxic, lead-free, and designed for pet use. It’s crafted with pet-friendly materials that ensure your dog’s safety. Unlike natural grass, it doesn’t require chemical fertilizers, pesticides, or herbicides that could harm your pet. The surface also helps reduce the chances of skin irritation and allergies that some dogs experience with natural grass.5. How Do I Clean the Outdoor Turf for Dogs?Cleaning outdoor turf for dogs is simple. Regularly rinse it with water, use a pet-friendly turf deodorizer, and remove solid waste just as you would on natural grass. For deeper cleaning, enzymatic cleaners help break down organic matter and neutralize odors. Regular maintenance, such as brushing the turf fibers, keeps the area fresh and looking great.6. Can Dogs Dig Through Artificial Grass?No, most high-quality turf grass for dogs is installed with a secure base that prevents digging. However, if your dog is a determined digger, reinforcing the edges may be necessary. Some pet-friendly turf installations use additional reinforcement layers that deter dogs from attempting to dig. You can also train your dog to avoid certain areas and provide alternative outlets for their digging instincts.7. Does Turf Grass for Dogs Drain Well?Yes, turf grass for dogs has excellent drainage capabilities. Most artificial grass products have a perforated backing that allows urine and water to drain quickly. This ensures that the turf remains dry and clean, even after rain or heavy use. Choosing a proper sub-base during installation further enhances drainage efficiency, making it a great solution for dog owners.8. Will My Yard Smell Like Urine?Proper maintenance prevents odors. Use a pet-friendly enzyme cleaner and hose down artificial grass for dogs outside regularly to keep it fresh. Additionally, installing proper drainage and using infill designed to neutralize odors will help maintain a fresh-smelling yard. Some pet-friendly infill options include antimicrobial agents that break down bacteria and prevent unpleasant smells from developing.9. Does Outdoor Turf for Dogs Look Real?Yes! Modern outdoor turf for dogs is designed to mimic the look and feel of natural grass. Many brands offer realistic textures and color variations. High-quality artificial grass often blends multiple shades of green with different blade lengths to create a natural appearance. Some even include brown thatch layers to resemble real grass more closely.10. Is Turf Grass for Dogs Durable?Absolutely! Turf grass for dogs is made to withstand heavy pet traffic, rough play, and all kinds of weather conditions. It resists wear and tear, remaining lush and intact even in high-use areas. This makes it a great investment for pet owners who want a long-lasting solution without constant maintenance.11. Will Weeds Grow Through Artificial Grass?Weeds are rare with artificial grass for dogs outside because it includes a weed barrier. Occasionally, some weeds may grow along the edges but can be easily removed. A well-installed artificial turf bay area system significantly reduces the chance of weed growth by using a compacted base and proper infill materials that prevent seeds from taking root.12. Is Artificial Turf Good for Dogs with Allergies?Yes! Many dogs suffer from grass allergies. Artificial grass for dogs outside eliminates pollen and other allergens that may irritate your pet’s skin or respiratory system. Since synthetic turf doesn’t produce pollen, it’s an excellent alternative for allergy-prone pets. Plus, it reduces exposure to outdoor chemicals that can cause allergic reactions.13. How Long Does Outdoor Turf for Dogs Last?With proper care, outdoor turf for dogs can last 10-15 years, making it a long-term investment for your pet’s play area. High-quality turf is designed to resist fading from UV exposure and withstand all weather conditions, ensuring it remains in excellent condition for years

Which Outdoor Lighting Does Not Attract Bugs
Uncategorized

Which Outdoor Lighting Does Not Attract Bugs?

Nothing ruins a relaxing evening outdoors like bugs swarming around your lights. If you’ve ever asked, “Which Outdoor Lighting Does Not Attract Bugs?”, you’re not alone! Bugs are naturally drawn to bright white and blue-toned lights, making them a magnet for unwanted pests. To keep your outdoor space bug-free, opt for warm-colored LED lights, yellow bug lights, or sodium vapor bulbs. These emit light in wavelengths that are less attractive to insects, significantly reducing their presence.For even better results, consider using motion sensors, shielding your lights, or placing them strategically to minimize bug attraction. With the right lighting choices, you can enjoy a bright and comfortable outdoor space—without the buzzing intruders!Why Are Bugs Attracted to Light? Before diving into outdoor lights that don’t attract bugs, let’s first understand why insects swarm around artificial lights. Many bugs, especially moths and other flying insects, are naturally drawn to light sources due to phototaxis, an instinctive response to light. Traditional bulbs, especially those emitting UV and blue wavelengths, are particularly attractive to bugs. The heat from incandescent bulbs can also lure insects, making your porch or backyard a prime bug zone. What Color Light Does Not Attract Bugs? Want to keep pesky bugs away from your outdoor lights? The secret lies in choosing the right light color! Bugs are naturally drawn to cool, bright lights like white and blue, but they struggle to see warmer tones. Yellow Light – The best option for minimizing bug attraction, as many insects cannot see yellow light effectively. Amber Light – Similar to yellow light, amber tones reduce insect visibility and attraction. Red and Orange Light – These colors fall on the longer wavelength spectrum and are less appealing to bugs compared to blue or white light. Warm White Light – While cooler white light tends to attract bugs, warmer shades of white are less appealing to insects. Best Outdoor Lights That Don’t Attract Bugs If you’re looking for outdoor lights that don’t attract bugs, consider switching to one of these options:1. LED Lights That Don’t Attract BugsLED bulbs are an excellent choice for outdoor Landscape lighting Bay area because they emit very little heat and can be selected in bug-repellent colors like yellow or amber. Standard cool white LEDs may still attract insects, but choosing warm white or yellow-tinted LEDs significantly reduces bug presence. Additionally, LEDs are energy-efficient and long-lasting, making them a great investment for outdoor spaces.2. Sodium Vapor BulbsLow-pressure sodium vapor bulbs emit a yellow-orange glow that insects tend to ignore. These are commonly used in street lighting and can be a great option for patios and gardens. While they may not provide the most aesthetically pleasing light, they are highly effective in reducing bug attraction.3. Bug Light BulbsMany manufacturers now offer outdoor bug light bulbs specifically designed to minimize insect attraction. These bulbs are usually tinted yellow and labeled as “bug lights,” making them a simple switch for any outdoor fixture. They are widely available and easy to install, providing an immediate solution to bug problems.4. Warm-Colored CFLsCompact Fluorescent Lights (CFLs) that emit warm white or yellow light attract fewer bugs than standard cool white CFLs. If you still prefer CFL lighting, opt for lower-wattage, warm-toned varieties. These bulbs provide a good balance between energy efficiency and bug resistance.5. Halogen Bulbs with Warm TonesHalogen bulbs that emit warmer hues can also be effective in keeping bugs away. Although they generate more heat than LEDs, they still attract fewer insects than traditional incandescent bulbs.Additional Tips to Keep Bugs Away from Outdoor Lights Besides selecting the right lights that don’t attract bugs, here are some extra strategies to keep your outdoor space bug-free: Position Lights Strategically – Place lights farther away from gathering areas so bugs are drawn away from where people are sitting. Use Motion-Sensor or Timed Lights – Reducing the amount of time lights are on can minimize bug attraction. Install Light Fixtures with Shields – Using fixtures that direct light downward can prevent it from scattering and attracting flying insects. Try Citronella or Essential Oils – Certain scents like citronella, lavender, and eucalyptus naturally repel bugs. Use Screens and Enclosures – If you have a patio or porch, consider adding screens or outdoor curtains to create a barrier between you and insects. Reduce Nearby Standing Water – Mosquitoes and other pests breed in stagnant water, so removing sources of standing water can help keep bug populations down. Keep Outdoor Areas Clean – Leftover food, open trash bins, and sugary drinks can attract more bugs. Keeping your space tidy can help mitigate this issue. Combine Multiple Strategies – Using a combination of bug-repelling lights, proper fixture placement, and natural repellents can significantly improve your outdoor experience. Final Thought If you’re wondering which outdoor lighting does not attract bugs, the answer lies in choosing the right bulb type, color, and placement. Opting for LED lights that don’t attract bugs, yellow-tinted bulbs, or outdoor bug light bulbs can make a significant difference in reducing insect activity around your home.By implementing these strategies, you can enjoy your backyard, patio, or garden without the nuisance of bugs swarming around. A well-lit outdoor space doesn’t have to mean dealing with insects—choose the right lighting, incorporate natural repellents, and optimize your environment for a comfortable, bug-free experience.Ready to upgrade your outdoor lighting for a bug-free experience? Contact Lakota Design Group today for expert advice and customized lighting solutions that suit your space. Enjoy peaceful evenings under the stars with the right outdoor lighting that keeps bugs away!FAQsWhat type of outdoor lighting attracts the least bugs?Yellow, amber, and warm white LED lights attract fewer bugs compared to bright white or blue-toned lights.Do LED lights attract bugs?Cool white LEDs can attract bugs, but warm white or yellow-tinted LEDs significantly reduce insect attraction.Why are bugs attracted to light?Many insects are drawn to UV and blue wavelengths due to phototaxis, an instinctive response to light.What color light does not attract bugs?Yellow, amber, red, and orange lights are less visible to bugs and

Benefits of Adding an Outdoor Patio to Your Home
Uncategorized

Benefits of Adding an Outdoor Patio to Your Home

Picture stepping into a thoughtfully crafted outdoor area that invites relaxation, social gatherings, and time spent in the open air. Adding an outdoor patio to your home does more than boost curb appeal—it creates a seamless extension of your indoor living space, offering both comfort and functionality. This addition not only elevates your everyday lifestyle but also adds significant value to your property. Whether you’re envisioning a peaceful escape or a lively space for entertaining, an outdoor patio is a transformative feature that enhances any home.Boost Your Home’s Value with a PatioHomeowners often wonder, “Will a patio add value to my home?” Absolutely! A thoughtfully designed patio enhances your property’s appeal by expanding usable space, improving visual charm, and attracting potential buyers. Whether you choose a sleek concrete surface or invest in expert Bay Area paver installation, a patio is a smart upgrade with lasting benefits. Beyond raising your home’s market value, it also creates the perfect setting for comfortable and enjoyable outdoor living. Choosing the Right Material: Paver Patio vs. Concrete Slabs When designing your patio, the material you choose plays a key role in both functionality and long-term satisfaction. Homeowners often ask, “What is a paver patio?” and “Are concrete slabs a good choice?” Staying informed helps ensure your investment adds value, durability, and visual appeal to your outdoor space.A paver patio is made from individual interlocking stones arranged in custom patterns. Known for their durability and versatility, pavers are an excellent option for high-traffic areas. One of the standout benefits of a paver patio is its ability to resist cracking. If any damage occurs, individual pavers can be replaced without disturbing the entire patio. Available in a wide range of colors, shapes, and textures, pavers make it easy to match your outdoor aesthetic while providing lasting performance in various weather conditions—especially important in climates like the Bay Area.Concrete slabs, on the other hand, offer a more budget-conscious alternative. They deliver a clean, minimalist appearance and are relatively quick to install. While concrete is generally durable, it’s more susceptible to cracking from temperature fluctuations or shifting soil. Maintenance, including sealing and occasional resurfacing, is required to keep it in good shape. However, for homeowners prioritizing affordability without compromising on function, concrete slabs still offer practical backyard patio benefits.Whether you go with paver patio installation for its style and longevity, or choose concrete for its cost-efficiency, selecting the right material ensures your patio will enhance both the beauty and usability of your outdoor space.How Much Does a Paver Patio Installation Cost? The cost of installing a paver patio can vary depending on several factors, including the type of pavers, project size, site preparation, and labor. Homeowners should budget between $10 and $25 per square foot on average. While this price point is generally higher than that of a standard concrete slab, the added value of pavers—such as enhanced durability, minimal maintenance, and a wide range of design options—makes it a smart, long-term investment.If you’re comparing options and asking, “Are concrete slabs a good choice for a patio?”—they can be a more budget-friendly solution. However, pavers offer superior aesthetic flexibility, better resistance to cracking, and easier repair in case of damage. For homeowners looking to boost curb appeal and functionality, the benefits of a paver patio installation often outweigh the initial cost.Additional Factors to Consider When Building a PatioWhen designing your outdoor patio, there are a few additional factors to keep in mind: Climate Considerations: If you live in an area with extreme weather, pavers may be a better choice due to their ability to expand and contract without cracking. Drainage Solutions: Proper drainage is crucial to prevent water pooling, which can lead to damage over time. Landscaping Integration: Consider how your patio will blend with the surrounding greenery and outdoor elements. Furniture and Accessories: Choosing the right patio furniture, lighting, and decorative elements will enhance the overall ambiance and functionality of the space. Enhance Your Outdoor Living Experience Beyond increasing home value, an outdoor patio provides numerous lifestyle benefits: Perfect for Entertaining: Host BBQs, dinner parties, or family gatherings in an inviting outdoor setting. Creates a Relaxing Escape: Enjoy morning coffee, read a book, or unwind after a long day in your serene outdoor space. Low Maintenance & Durable: With the right materials, your patio can withstand the elements and require minimal upkeep. Personalized Aesthetic: Whether you prefer a rustic, modern, or classic look, patios can be customized to match your vision. Final Thoughts If you’ve wondered, “Does a patio add value to your home?”—the answer is yes! A well-designed patio enhances property value, creates a relaxing space, and offers long-term benefits. Whether you choose pavers or concrete slabs, it’s a smart investment.The Benefits of Adding an Outdoor Patio to Your Home go beyond aesthetics. It boosts curb appeal, provides a perfect spot to unwind, and enhances outdoor living.Choose Lakota Design Group for expert patio design and installation. Start planning today and transform your outdoor space!FAQS What are the benefits of adding an outdoor patio to your home?An outdoor patio extends your living space, providing a comfortable area to relax, entertain, and enjoy fresh air. It enhances your lifestyle and increases your property’s value. Does adding a patio increase my home’s value?Yes, a well-designed patio can significantly boost your home’s resale value by offering additional functional space and enhancing curb appeal, making your property more appealing to potential buyers. What’s the difference between a paver patio and concrete slabs?A paver patio is made of individual paving stones, offering better durability and flexibility, while concrete slabs are a more affordable option but can crack over time and require more maintenance. How much does a paver patio installation cost?Paver patio installation typically costs between $10 to $25 per square foot, depending on material and size. While pricier than concrete slabs, pavers offer better longevity and aesthetic appeal. What factors should I consider when building a patio?Consider your climate, drainage solutions, landscaping integration, and the right furniture and accessories to enhance

Lighting Tips to Elegantly Enhance Your Water Feature
Uncategorized

Lighting Tips to Elegantly Enhance Your Water Feature

Lighting plays a pivotal role in transforming any water feature into a stunning focal point, whether it’s a grand outdoor fountain or a serene indoor water fountain. If you’re looking to elevate the beauty of your water feature, follow these Lighting Tips to Elegantly Enhance Your Water Feature. These simple yet effective lighting techniques will not only bring your fountain to life after dark but also create an atmosphere of peace and sophistication in your space. Highlight the Flow of Water with Subtle LightingOne of the most effective ways to light your water feature is by using subtle lighting that highlights the movement of water. This technique allows you to showcase the calming ripple and flow of the water, making your fountain appear more dynamic. When considering how to light existing fountain, think about placing low-profile, waterproof LED lights for outdoor water fountains around the base or beneath the surface of the water. This type of lighting will cast a soft glow and enhance the natural textures and patterns of the water as it flows.Pro Tip: If you’re lighting a fountain with multiple tiers, place lights near the base of each tier for added visual interest and depth.Use LED Lights for Energy-Efficiency and Longevity When it comes to lighting a fountain, LED lights are a top choice due to their energy efficiency and long lifespan. LED lights for outdoor water fountains are available in various colors and brightness settings, giving you full control over the ambiance you wish to create. Whether you want a cool, serene light or a warm, inviting glow, LED lights provide flexibility while reducing your electricity bills.In addition to being energy-efficient, LED lights can withstand exposure to water and harsh outdoor conditions. This makes them perfect for long-term use in water features, whether in your garden, backyard, or indoor space. Incorporate Underwater Lighting for a Magical Effect Underwater lighting is a fantastic way to add a magical effect to your water feature. By placing waterproof, low-voltage lights below the water’s surface, you can create a mesmerizing glow that reflects off the ripples and waves. This technique is especially effective for large outdoor fountains or decorative ponds. If you’re wondering how to light existing fountain, this approach can be easily adapted by installing submersible LED landscape lighting bay area that shine up through the water.Bonus Tip: Consider using color-changing LED lights to create a stunning visual display. This can add an extra layer of excitement and allow you to customize the mood based on the time of day or occasion.Ambient Lighting Around Your Fountain to Set the MoodIn addition to focusing on the water itself, don’t forget the surrounding area. Adding ambient lighting around your fountain can help integrate it into the rest of your outdoor or indoor space. Strategically placed path lights, spotlights, or lantern-style lighting around the perimeter of the water feature will help create a harmonious atmosphere. For a more refined look, opt for sleek, modern lighting fixtures that complement the design of your fountain.For indoor water fountain lights, soft, diffused lighting around the fountain’s base can offer a subtle glow that creates an intimate atmosphere, perfect for relaxation or meditation.Consider the Placement of Lights for Maximum Impact When lighting a fountain, the placement of your lights is just as important as the type of lighting you choose. To truly enhance your water feature, place lights at various angles and elevations. Use spotlights to accentuate the most dramatic features, such as cascading water or stone structures. Meanwhile, soft, indirect lighting placed at ground level will add a warm glow to the surroundings, highlighting the beauty of the fountain and its environment. Illuminate the Surrounding Landscape to Create a Cohesive Look Finally, consider illuminating the surrounding landscape around your water feature. The natural beauty of plants, rocks, and sculptures can be accentuated with the right lighting, helping your water feature blend seamlessly into the entire outdoor or indoor design. Use soft uplighting to highlight nearby trees or shrubs and add texture with shadows that compliment your fountain.Conclusion: Achieving a Stunning Water Feature with the Right Lighting With these lighting tips, you can easily transform your water feature into a breathtaking masterpiece. Whether you’re looking for subtle ambiance or a dramatic showcase, lighting tips to elegantly enhance your water feature is the key to making your fountain shine. From LED lights for outdoor water fountains to indoor water fountain lights, the possibilities are endless. By strategically placing lights around your fountain, you can create stunning reflections and beautiful shadows that enhance its architectural features and the natural beauty of the water. The right lighting can set the perfect mood, whether you’re hosting guests or enjoying a quiet evening outdoors. So, illuminate your space, and let your water feature become a captivating focal point that adds both elegance and tranquility to your environment. With thoughtful lighting choices, your fountain will not only glow after dark but will also become a lasting piece of art that enhances your entire space.FAQS How can I light my existing fountain effectively?Use LED lights for outdoor water fountains to place under or around your fountain. This will highlight the water’s flow and create a peaceful ambiance. What type of lights are best for a water fountain?LED lights are ideal for lighting a fountain because they’re energy-efficient, waterproof, and provide vibrant colors or soft glows, depending on the desired effect. Can I use LED lights in an indoor fountain?Yes, indoor water fountain lights are great for creating a relaxing atmosphere and offering gentle illumination without using too much energy. How do I light a multi-tiered fountain?Place LED lights for outdoor water fountains at different levels of the tiers to add depth and showcase the cascading water, creating a stunning visual effect. What’s the best lighting for highlighting water movement in my fountain?Underwater LED lights for outdoor water fountains work best, as they accentuate the water’s movement with a soft, glowing effect.

How to Use Landscape Lighting Along Your Driveway
Uncategorized

How to Use Landscape Lighting Along Your Driveway

Your driveway is the gateway to your home—make it shine! With the right landscape lighting, you can create a stunning, safe, and welcoming entrance. In this guide, we’ll explore how to use landscape lighting along your driveway to boost curb appeal, improve visibility, and add a warm, inviting glow. From elegant path lights to dramatic uplighting, we’ll share creative and practical ideas to beautifully illuminate your driveway. Get ready to transform your entrance with style and brilliance!Why Choose Landscape Lighting for Your Driveway? Landscape lighting not only adds curb appeal, but it also increases safety and security around your home. Imagine driving up to a well-lit driveway that guides you smoothly to your garage or parking space. Good lighting makes a dramatic impact, but it also provides visibility during the night, preventing potential accidents. So, let’s explore how to use landscape lighting along your driveway to transform the space into a well-lit and inviting pathway. Start with Driveway Landscape Lights for Safety Safety should always come first when incorporating landscape lighting along your driveway. Ensuring proper illumination along the edges helps prevent trips, falls, and potential accidents, especially in low-light conditions. Driveway landscape lights serve as guides, making it easier for drivers to navigate while also providing a welcoming ambiance for guests.Solar-powered lights are an excellent choice for effortless installation and energy efficiency. These lights charge during the day and automatically illuminate at night, offering a hassle-free solution without the need for wiring. If you prefer a more customized approach, low-voltage LED lighting provides long-lasting brightness while keeping energy consumption low.Create a Dramatic Look with Path Lights Path lights are a perfect way to enhance both the beauty and functionality of your driveway. These low-profile fixtures not only illuminate the way for vehicles and pedestrians but also add a touch of elegance to your outdoor space. By strategically placing outdoor driveway Bay Area lighting along the edges, you create a warm and inviting ambiance while improving nighttime visibility.For a cohesive look, select path lights that complement your home’s architectural style. Sleek, modern fixtures work well with contemporary homes, while lantern-style or rustic designs can enhance a more traditional or farmhouse aesthetic. Spacing the lights evenly along your driveway ensures a balanced look, preventing overly bright or shadowy areas.Incorporate Spotlights for Accent Lighting For a more dramatic effect, consider using spotlights to highlight key features along your driveway, such as trees, shrubs, or decorative elements. This not only enhances your home’s curb appeal but also adds an elegant architectural touch to your outdoor space.Strategically placed spotlights can create stunning focal points, drawing attention to beautifully landscaped areas or unique hardscape details. They also cast eye-catching shadows, adding depth and dimension to your driveway at night. Whether you want to showcase a majestic tree, a stone pathway, or a stylish entry gate, spotlights help create a visually striking ambiance. Install Under-Cabinet or Under-Gate Lighting for Subtle Illumination Sometimes, subtlety can make all the difference in driveway landscape lighting. If you prefer a more understated yet sophisticated approach, consider installing under-cabinet or under-gate lighting. These low-profile fixtures provide gentle illumination, enhancing visibility without overwhelming the space.Perfect for driveways with fences, gates, or arbors, under-lighting creates a soft, inviting glow that guides the way while adding a touch of elegance. Strategically placing these lights below architectural features ensures a seamless and modern look, highlighting textures and structures without the glare of traditional lighting.For an extra layer of ambiance, opt for warm LED tones that mimic the beauty of moonlight, or choose dimmable options to control brightness levels. This minimalist lighting technique not only improves aesthetics but also enhances safety, helping guests and residents navigate your driveway with ease.By blending function with subtle beauty, under-gate and under-cabinet lighting transforms your driveway into a welcoming, well-lit pathway that radiates warmth and style.Add Motion Sensor Lights for Security Incorporating motion sensor lights along your driveway doesn’t just make it easier to navigate after dark—it also enhances the security and efficiency of your home. These smart lighting solutions automatically activate when they detect movement, providing instant illumination to guide your way while deterring potential intruders.Motion sensor driveway landscape lighting Bay area is an excellent choice for homeowners looking to boost safety without increasing energy costs. Since the lights only turn on when needed, they help conserve electricity while still ensuring your driveway is well-lit when it matters most.For a seamless look, consider placing motion-activated lights along pathways, near garage entrances, or mounted on pillars for a stylish yet functional touch. Some modern options even offer adjustable sensitivity settings and smart-home integration, allowing you to customize when and how they activate.By combining convenience, security, and energy efficiency, motion sensor lighting adds both peace of mind and elegance to your outdoor space, making your driveway as smart as it is stunning!Explore Creative Lighting Ideas for Special Effects Want to go beyond the basics? There are countless driveway landscape lighting ideas to transform your entrance into something extraordinary. Imagine pulling up to your home and being greeted by a beautifully illuminated path, creating a warm and inviting atmosphere.For a touch of elegance, consider lining your driveway with soft-glow pathway lights that guide the way while adding charm. Want a bit of drama? Try uplighting trees or architectural features for a striking visual effect. String lights draped over trees or arbors can create a magical, fairy-tale ambiance, perfect for cozy evenings outdoors.If you have a long driveway, take it up a notch by installing driveway landscape lights on pillars or stone columns for a grand, cinematic effect. Motion-sensor lighting can provide added security while ensuring your home always looks its best. For a modern touch, consider sleek, low-voltage LED lights that offer energy efficiency and a contemporary aesthetic. Final Thoughts Incorporating Landscape Lighting Bay Area along your driveway does more than just brighten the space – it enhances curb appeal, increases safety, and boosts your home’s overall aesthetic. From driveway landscape lights to outdoor driveway lighting ideas, there are countless ways

When You Need a Permit for Your Landscape Project
Uncategorized

When You Need a Permit for Your Landscape Project

Transforming your outdoor space into a beautiful, functional oasis is exciting, but before you start, you may be wondering, “Do I need a permit for landscaping?” Understanding When You Need a Permit for Your Landscape Project is crucial, especially if you’re planning to regrade your yard, install a retaining wall, or add outdoor structures. Knowing the permit requirements ensures a smooth process and helps you avoid unexpected delays.Permits are not just formalities; they ensure your project complies with local building codes, environmental guidelines, and safety standards. Asking questions like “Does landscaping require a permit?” or “Do I need a permit to regrade my yard?” is essential to avoid costly mistakes. For example, regrading affects drainage patterns, and improper work could lead to flooding or erosion issues. Similarly, structures like decks or retaining walls may require a building permit to ensure they are safe and meet local regulations.Read on to learn how to determine When You Need a Permit for Your Landscape Project, what types of projects typically require one, and how to plan your landscaping project the right way.Does Landscaping Require a Permit?The short answer is: it depends. While simple Bay area landscaping design tasks such as planting flowers or mowing your lawn don’t usually require a permit, larger-scale projects often do.Here are some common situations where you may need to check with your local government: Major Grading or Excavation If you’re regrading your yard to improve drainage or level your property, you might be asking yourself, “Do I need a permit to regrade my yard?” In most cases, the answer is yes. Regrading can affect water flow, erosion, and neighboring properties, so local building codes typically require a permit for these changes. Installing Retaining Walls or Fences Adding a retaining wall to prevent erosion or installing a tall fence for privacy often requires a building permit. These structures need to meet specific safety and design standards set by your municipality. Decks, Patios, or Outdoor Kitchens If your landscaping plans include permanent features such as a deck, patio, or outdoor kitchen, you’ll likely need a permit. These additions are considered building structures and must comply with local zoning laws. Irrigation Systems or Pools Large-scale irrigation systems and swimming pools often need permits to ensure proper water use and safety standards. Be sure to check local requirements before you start digging. Do You Need a Permit for Landscaping Projects?If your project involves minor improvements—such as planting shrubs, laying sod, or adding a small garden bed—you likely won’t need a permit. However, larger projects that alter the landscape may require approval.No Permit Needed: Planting flowers, mulching, or adding small decorative features.Permit Often Required: Changing grading, drainage, building retaining walls, installing outdoor lighting, or adding large hardscape elements like decks or patios.To avoid fines and project delays, contact your local planning or building department and ask, “Does landscaping require a permit in this area?” They’ll provide location-specific guidelines to ensure compliance before you start your project!Do I Need a Building Permit for Landscaping?You might be surprised to learn that some landscaping elements fall under building permit requirements. These include: Pergolas, Gazebos, and Sheds: Any structure exceeding a certain height or size often needs approval. Retaining Walls Over a Certain Height: Walls exceeding 3-4 feet typically require permits to ensure structural integrity. Water Features: Large fountains or ponds may need permits due to water usage and safety concerns. Ignoring these requirements can result in fines, delays, or even removal of the unpermitted structures.How to Determine If You Need a PermitTo save time and money, follow these steps before starting your project:✅ Consult Your Local Building Department: Contact your local authorities to understand zoning laws, setback requirements, and necessary permits for your project. This helps avoid delays, fines, or costly revisions later.✅ Hire a Professional Landscaper: Experienced landscapers are well-versed in local permit regulations and can streamline the application process, ensuring compliance while saving you time and effort.✅ Review HOA Guidelines: If your community has a homeowners’ association (HOA), check their landscaping rules regarding fencing, plant choices, outdoor structures, and lighting to prevent violations or redesigns.Taking these steps upfront ensures a smooth, hassle-free landscaping process while keeping your project on track and within budget!Avoid Costly Mistakes: Plan AheadSkipping permits can lead to costly penalties, project delays, or even having to undo your hard work entirely.If you’re wondering, “Do I need a permit to regrade my yard?” or “Do I need a building permit for landscaping?”, the answer depends on your local regulations. Many cities and counties require permits for work that affects drainage, grading, retaining walls, outdoor structures, or electrical installations like landscape lighting.Failing to obtain the proper permits can result in hefty fines, stop-work orders, or legal issues, and in some cases, you may be forced to remove or redo completed work at your own expense.To avoid setbacks, always check with your local building department or HOA before starting your project. When in doubt, it’s better to err on the side of caution and verify before you build!Final ThoughtsWhen planning your landscape project, the key is understanding your local regulations and ensuring you’re compliant with permit requirements. Whether you’re regrading your yard, installing a retaining wall, or adding an outdoor feature, knowing when you need a permit for your landscape project will help you avoid headaches and create the outdoor space of your dreams.For more information and expert guidance, consider consulting a professional landscaper or contacting your local planning office. Your dream yard is worth doing the right way!FAQSDo I need a permit for landscaping projects in general?It depends on the scope of your project. Simple tasks like planting flowers or laying sod typically don’t require permits. However, projects involving regrading, building structures, or installing irrigation systems often need approval. Asking yourself, “Does landscaping require a permit?” before starting can save you from costly delays and compliance issues.Does my yard require a permit?Yes, in most cases, you need a permit to regrade your yard. Regrading affects drainage and can impact surrounding properties. If

How to Install a Paver Driveway
Uncategorized

How to Install a Paver Driveway: Tips and Tricks for a Durable Finish

Tired of looking at your cracked, worn-out driveway? A paver driveway can completely transform your home’s curb appeal and increase its value. Wondering how to install a paver driveway? While it might seem daunting, with the right tools and steps, you can create a beautiful, long-lasting driveway with ease.A well-installed paver driveway can last up to 30 years, offering both beauty and practicality. Don’t worry, we’ll guide you through every step—from planning and prepping the area to laying the pavers and finishing with those perfect details. With a little effort, you’ll have a driveway that not only enhances your home’s appearance but also endures the test of time. Ready to upgrade your driveway? Let’s get started! Why Choose a Paver Driveway for Your Bay Area Home?A Bay Area paver installation driveway offers numerous advantages over traditional concrete or asphalt surfaces, making it a smart investment for homeowners looking to enhance curb appeal, durability, and long-term value. Here’s why paver driveways are an excellent choice:1. Superior Durability and StrengthPaving stones are specifically engineered to handle heavy loads and frequent traffic without cracking or deteriorating over time. Unlike concrete, which is prone to cracking due to temperature fluctuations, or asphalt, which can soften in high heat, paver driveways remain strong and intact. Their interlocking design also distributes weight more effectively, reducing wear and tear.2. Enhanced Aesthetic Appeal and CustomizationOne of the biggest advantages of paver driveways is their versatility in design. Available in a wide range of styles, colors, shapes, and patterns, they allow homeowners to create a truly unique look that complements their home’s architectural style. Whether you prefer a classic, modern, or rustic appearance, pavers provide endless customization options. You can also incorporate borders, contrasting patterns, or even a mix of different stone types to enhance visual appeal.3. Low Maintenance and Easy RepairsUnlike concrete and asphalt driveways, which can be difficult and costly to repair, paver driveways offer an easy maintenance solution. If a paver becomes stained, cracked, or damaged, it can be removed and replaced individually without disturbing the entire surface. This feature not only saves time and money but also ensures that your driveway maintains its pristine appearance for years. Regular sweeping, occasional pressure washing, and reapplying joint sand as needed will keep your paver driveway looking fresh and well-maintained.4. Better Drainage and Eco-Friendly BenefitsPaver driveways promote better drainage compared to solid concrete or asphalt surfaces. Water can seep through the joints between pavers, reducing runoff and helping to prevent puddles, erosion, and water damage. Permeable paver options are also available, allowing rainwater to filter back into the ground, supporting eco-friendly landscaping solutions and minimizing strain on stormwater systems.5. Increased Property ValueA professionally installed paver driveway not only boosts your home’s curb appeal but also adds to its overall market value. The combination of beauty, durability, and low maintenance makes paver driveways an attractive feature for potential buyers, providing an excellent return on investment.Understanding the Costs of Paver InstallationNow that you’ve picked your materials and secured the necessary permits, let’s dive into the cost breakdown of how to install a paver driveway! Driveway paver installation typically ranges from $10 to $70 per square foot, with an average-sized driveway costing between $4,800 and $19,200.But don’t let that range throw you off! The final price depends on several key factors, like the size of your driveway, the type of pavers you choose, and any complexities of the installation site. Additional considerations, such as drainage systems or labor costs, can also influence your budget.Here’s the silver lining: Driveway paver installation is an investment that pays off. While the upfront cost may seem daunting, pavers require less stormwater management and lower maintenance over time. They’re durable, easy to clean, and can actually enhance your property’s value—plus, you could even save on water bills or stormwater fees down the road.Step-by-Step Guide How to Install a Paver Driveway1. Plan and Design Your DrivewayStart by measuring the area where you’ll lay your driveway pavers. Sketch a detailed plan, including dimensions and the desired pattern. Don’t forget to account for water drainage and slopes to prevent pooling.2. Excavate the AreaClear the area of grass, soil, and debris to a depth of about 12 inches. This depth allows for the base, bedding sand, and the pavers themselves. Use string and stakes to mark the boundaries of your driveway.3. Lay the BaseSpread a 6-8 inch layer of gravel evenly across the excavated area. Use the plate compactor to tamp it down firmly. This base provides stability and prevents shifting over time.4. Add a Layer of SandNext, spread a 1-inch layer of coarse sand over the compacted gravel. Use a level to ensure the surface is even. This layer acts as the bedding for your pavers.5. Install Edging MaterialsSecure the edges of your driveway with edging materials to keep the pavers in place. These can be plastic, metal, or concrete depending on your design.6. Lay the Paving StonesStart laying driveway pavers from one corner, working your way outward. Fit them snugly together according to your design. Use a rubber mallet to gently tap each paver into place.7. Fill the JointsOnce all the pavers are laid, sweep sand into the joints to lock them together. Polymeric sand is a great choice as it hardens when wet, creating a durable seal.8. Compact the SurfaceUse the plate compactor again to ensure the pavers are securely set. This also helps the sand settle into the joints.Tips and Tricks for SuccessChoose High-Quality Pavers: Don’t settle for less when it comes to materials! Investing in durable, high-quality pavers ensures your driveway can handle heavy traffic, harsh weather, and everything in between. It’s a small upgrade now that will save you big down the road.Work with a Partner: Two heads are better than one! Having an extra pair of hands can make all the difference, especially when tackling tasks like compacting. Team up to get the job done faster and more efficiently.Check Levels Frequently: Keep things smooth and functional! An uneven driveway can lead to

Our Client's Reviews

Copyright © 2025 | Localpro1 | All Rights Reserved.

English